Rag Rug
Well my dear blog reader, already I have failed you. I promised a new post every week and last week I did not post. I have no awesome excuse. I have been riddled with guilt but alas, I just didn’t have anything new to post. Was I not crafting? Well not much. Today I am back however and I apologize for my absence.
A couple of weeks ago my husband cleaned out his T-Shirt drawer. When he does this it’s like Christmas for me. I love love love to cut up t-shirts to make yarn. Something about the thriftiness of it all thrills me. What I end up with is a whole lot of t-shirt yarn and no project. I decided to start with the least pleasing colors and make a rug. Just to get a feel of the yarn and what it will look like when I work it up. 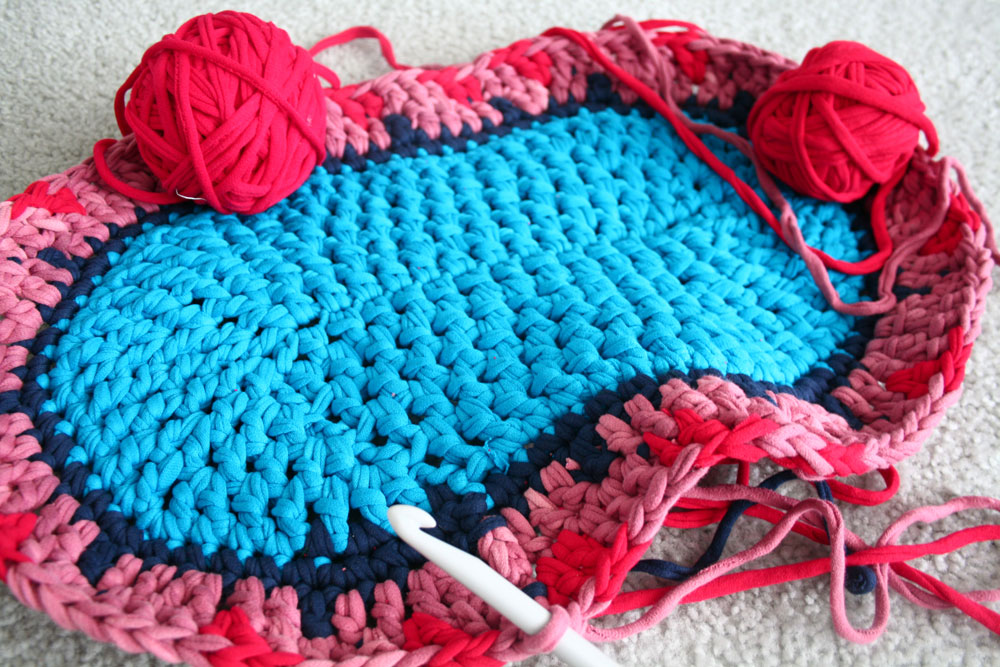
It’s ugly, I know. But it gets me going with other ideas. Want to make your own rag yarn? I was going to make a tutorial but it takes 2 hands to make this stuff and I’m not smart enough to figure out how to take photos at the same time. Why would I repeat what others have done so well anyway? So if you want to make your own t-shirt rag yarn (some people call it tarn…those people are crazy) look at this tutorial by Craft Passion. See how she made a basket at the end? That’s what I’m going to do next with my pretty colors of tarn.
Here are a few more photos to inspire you.
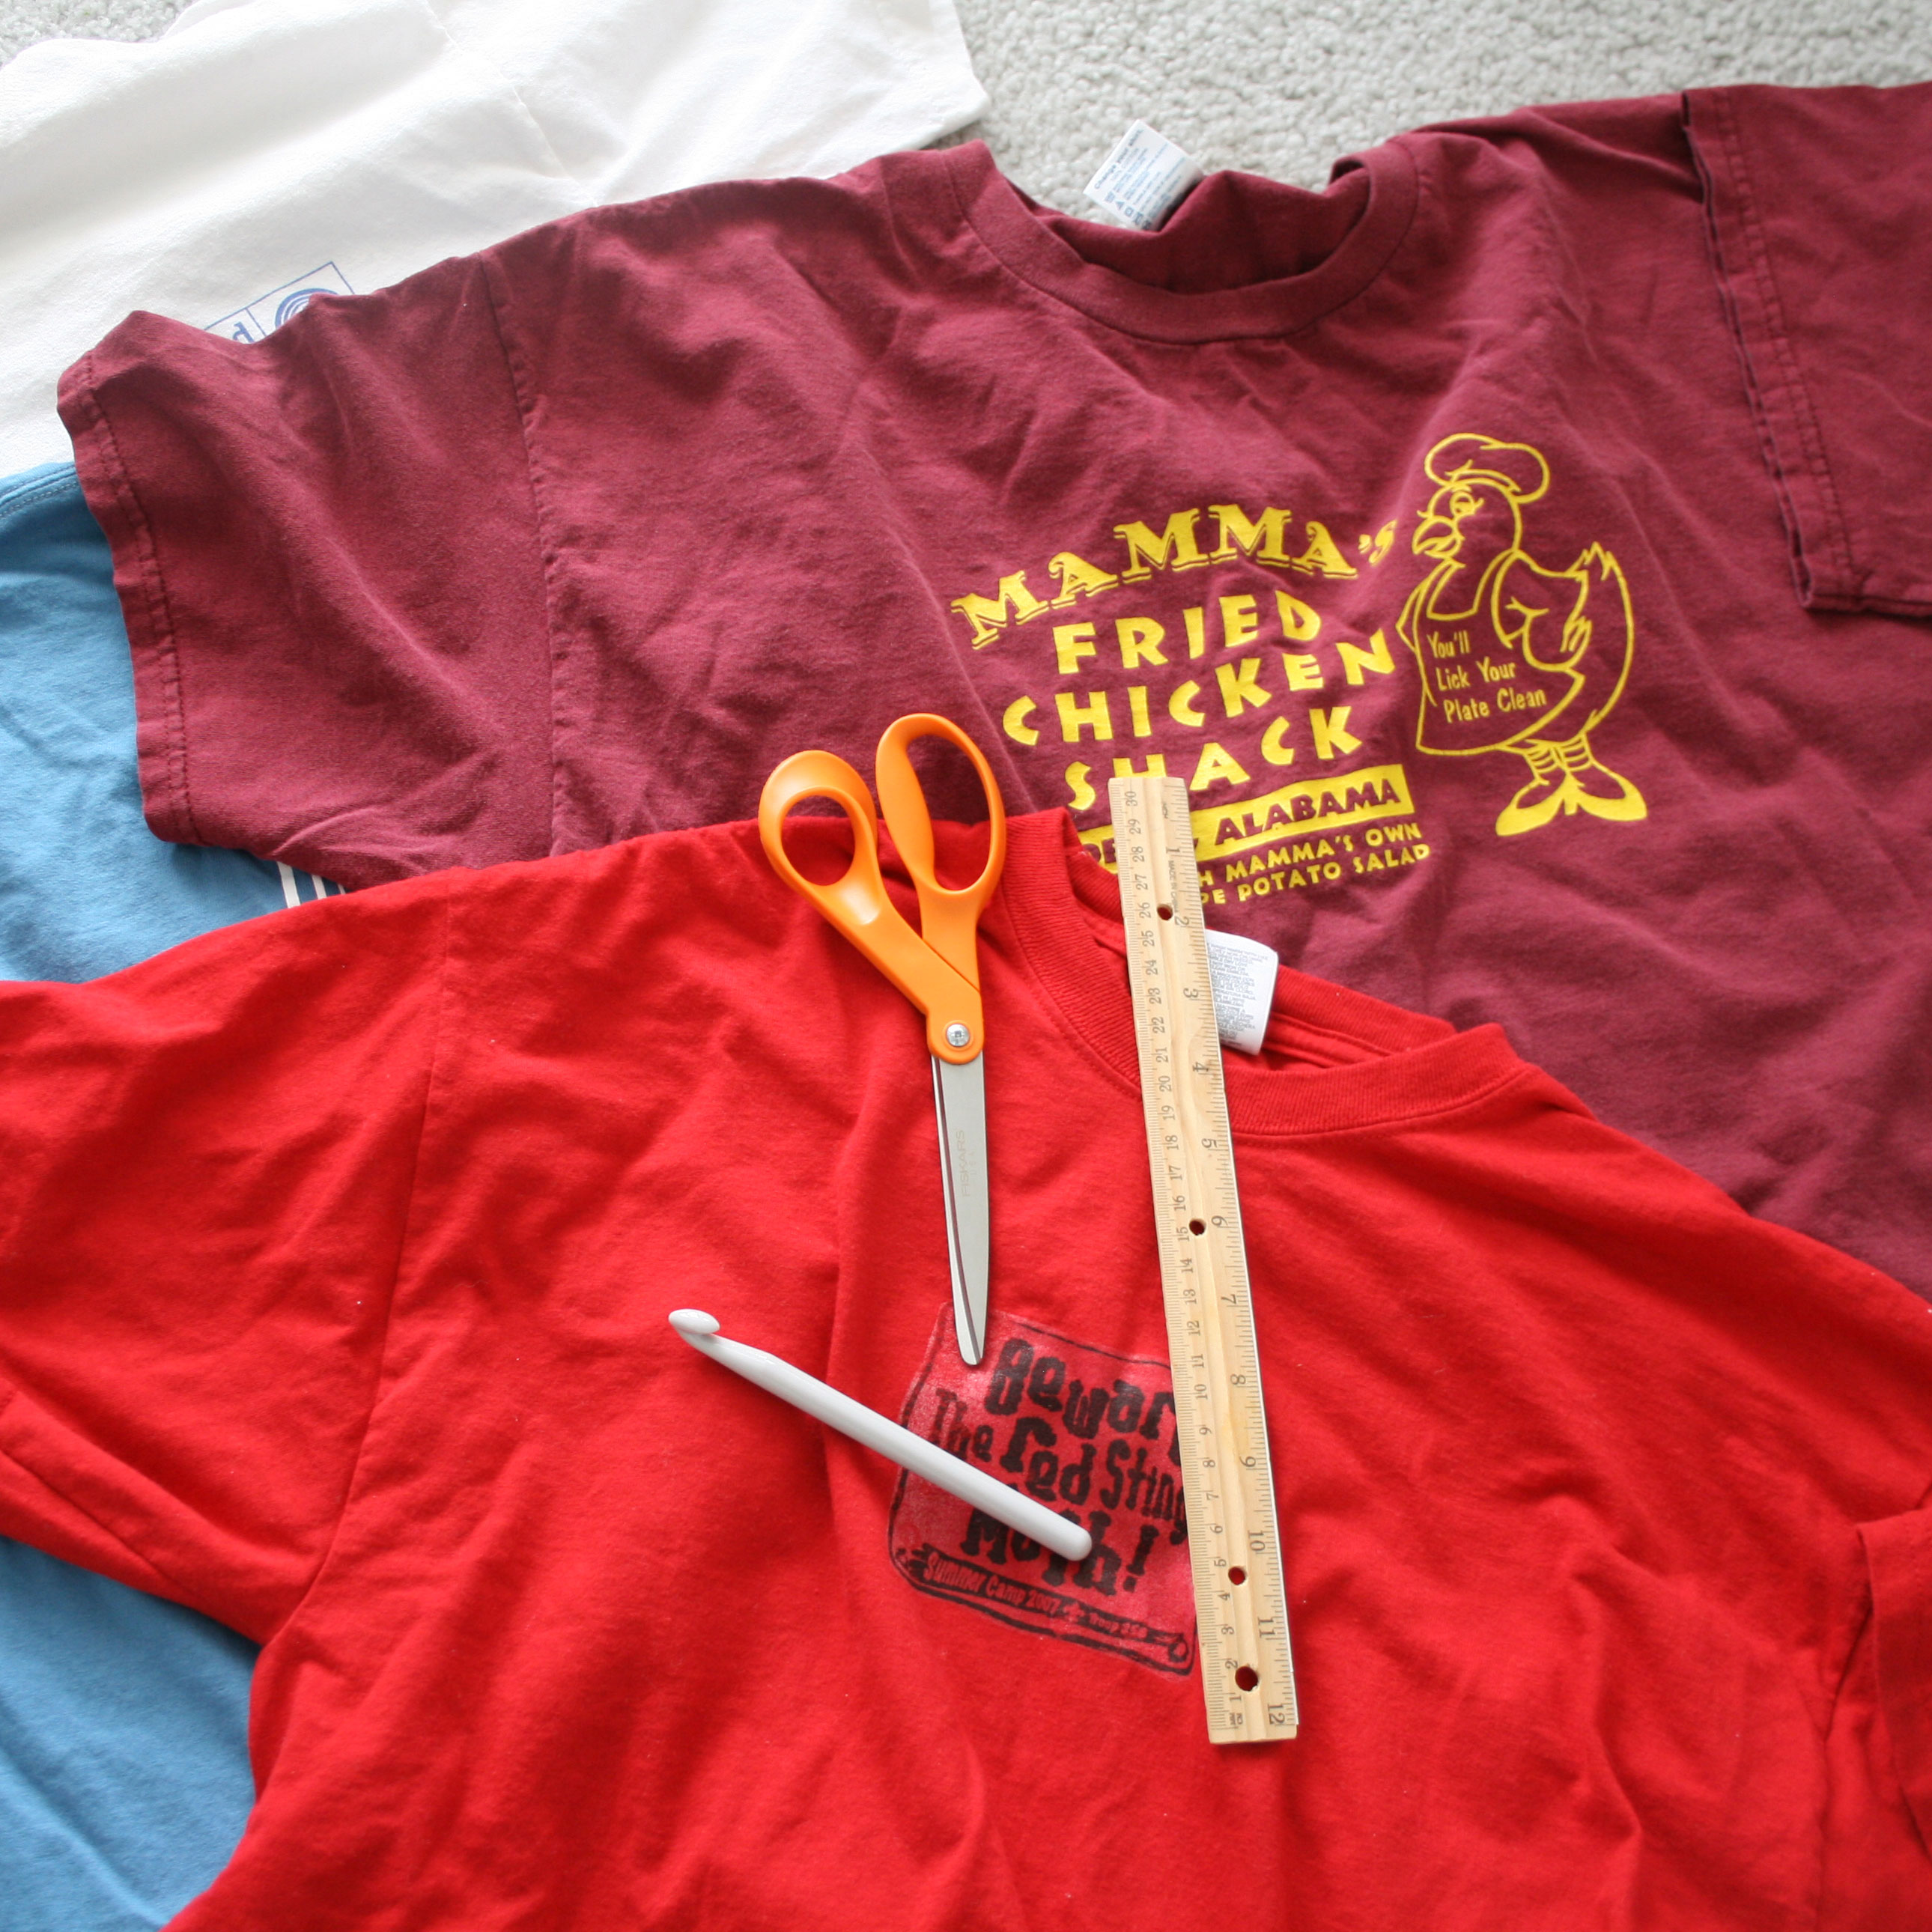
What you need
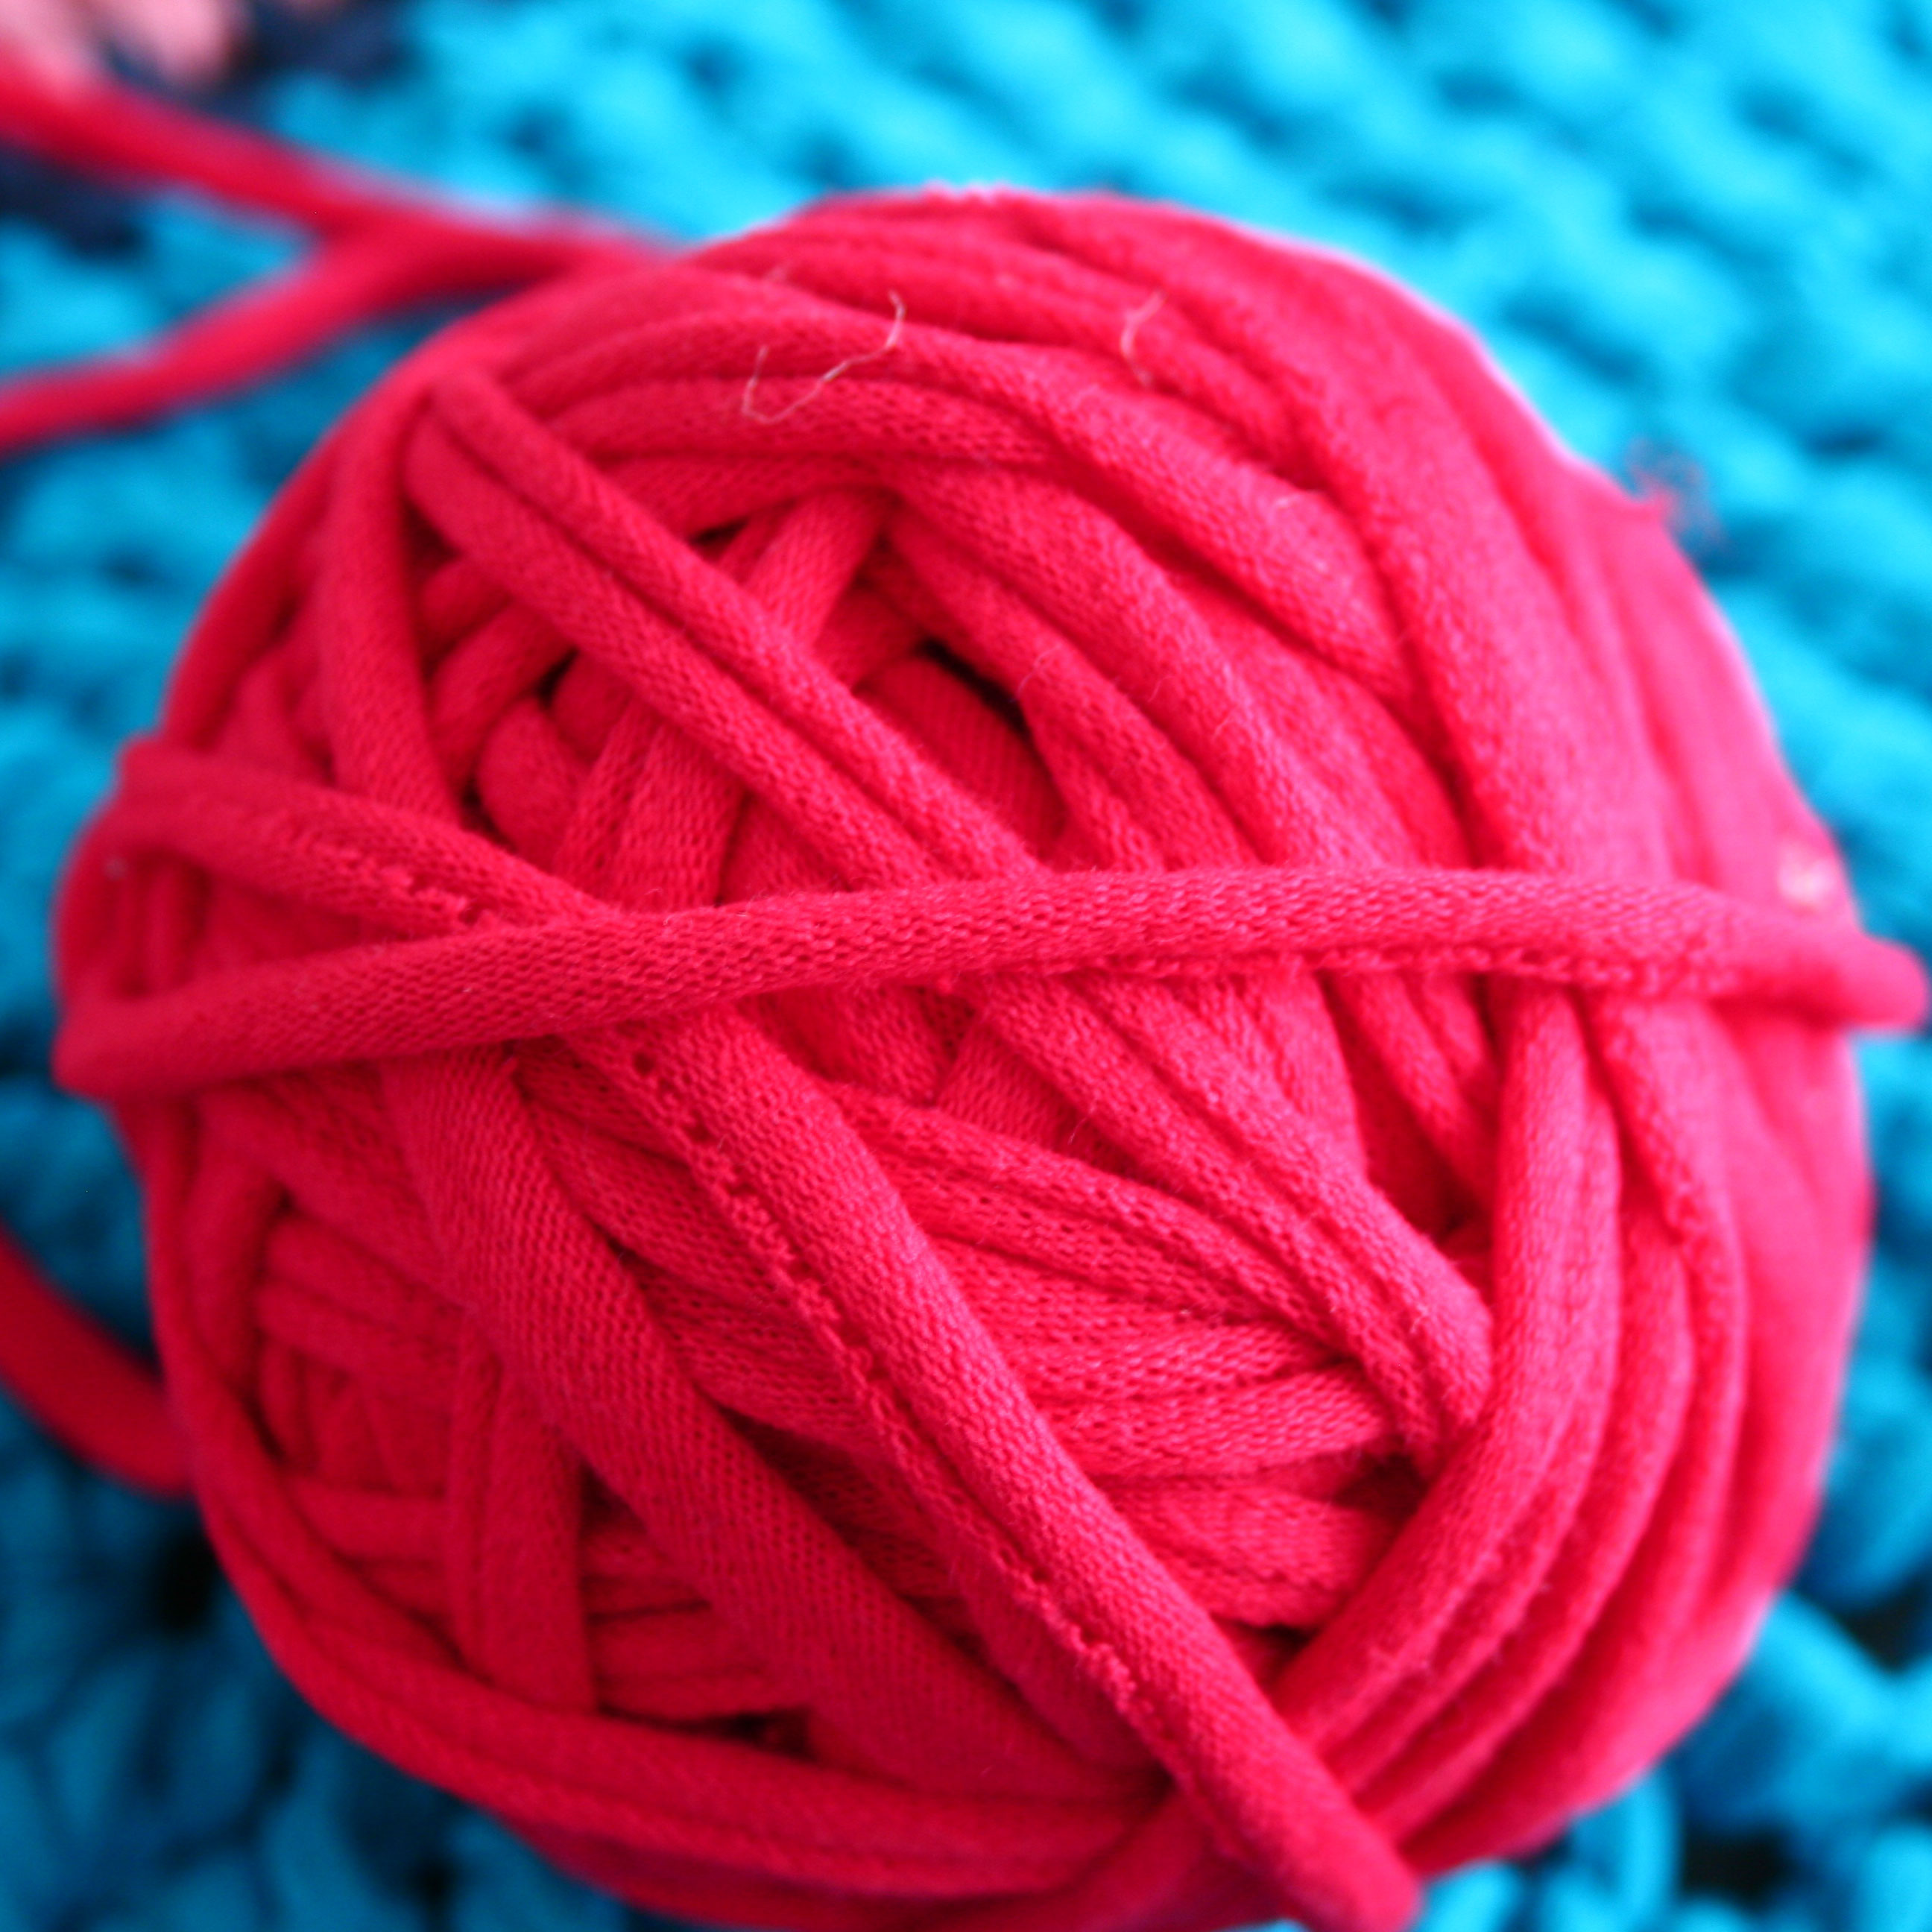
What the yarn looks like
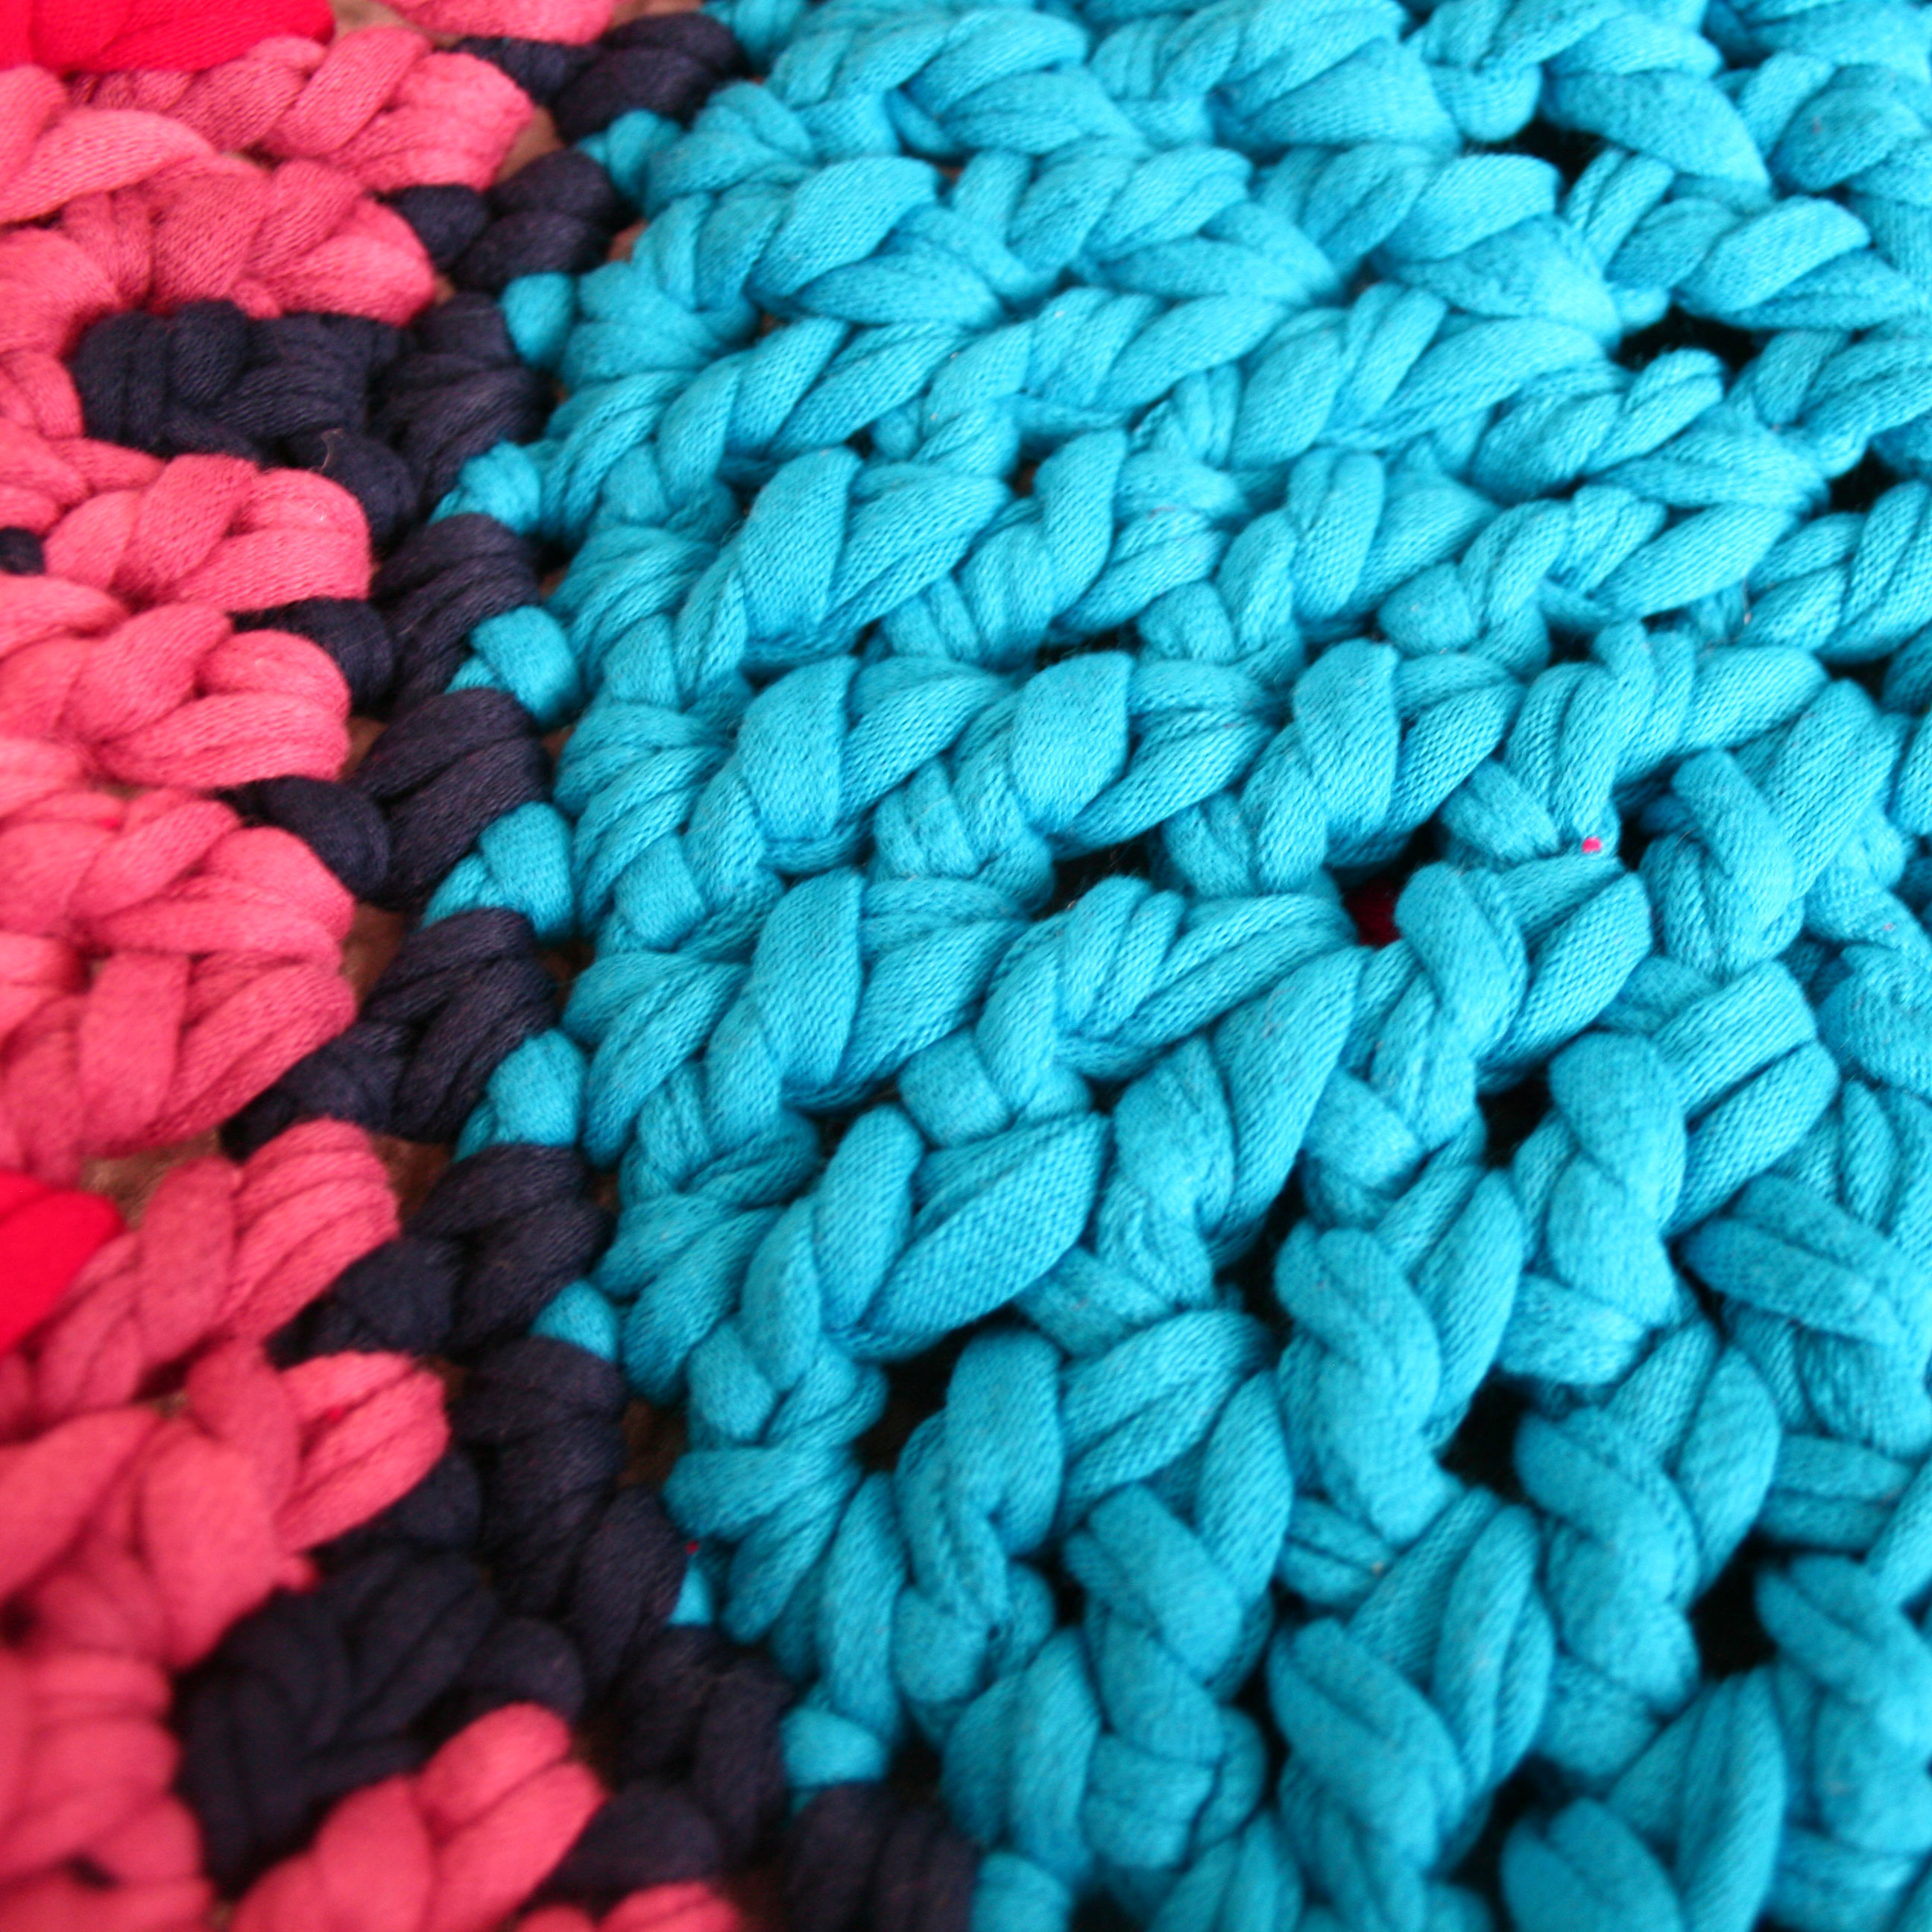
Close up on crochet
St. Patrick’s Day Wall Hanging
I love St. Patrick’s day. I love it because my favorite color is green. I used to hate it, I’m not a fan of pinching. The point is that I’m excited about this week’s craft because it’s GREEN!
I started with some green cotton yarn (my favorite is Peaches ‘n Cream brand but Walmart stopped carrying it. Jerks replaced it with a brand with a similar name but not similar quality. )
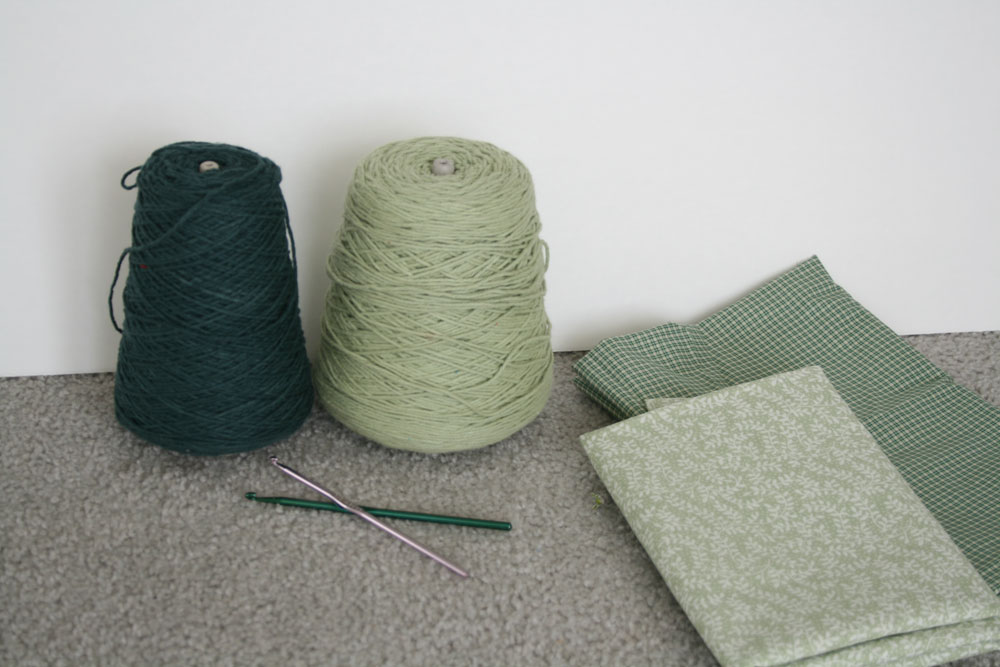 I buy my cotton on cones but I’m sure that you could make this with a couple of balls of one color and one ball of the other.
You will need :
2 Colors of green cotton yarn
H and a G crochet hooks
1/3 a yard of 2 different green printed fabrics
a sheet of foam board
a glue gun.
cut your fabric into 12 inch squares. Two of one color and one of the other color. Then cut your foam board into 10 inch squares. I use foam board because it’s cheap (i get mine at the dollar store), and because it’s light weight. I can hang my finished product with blue putty sticky stuff and no walls are damaged.
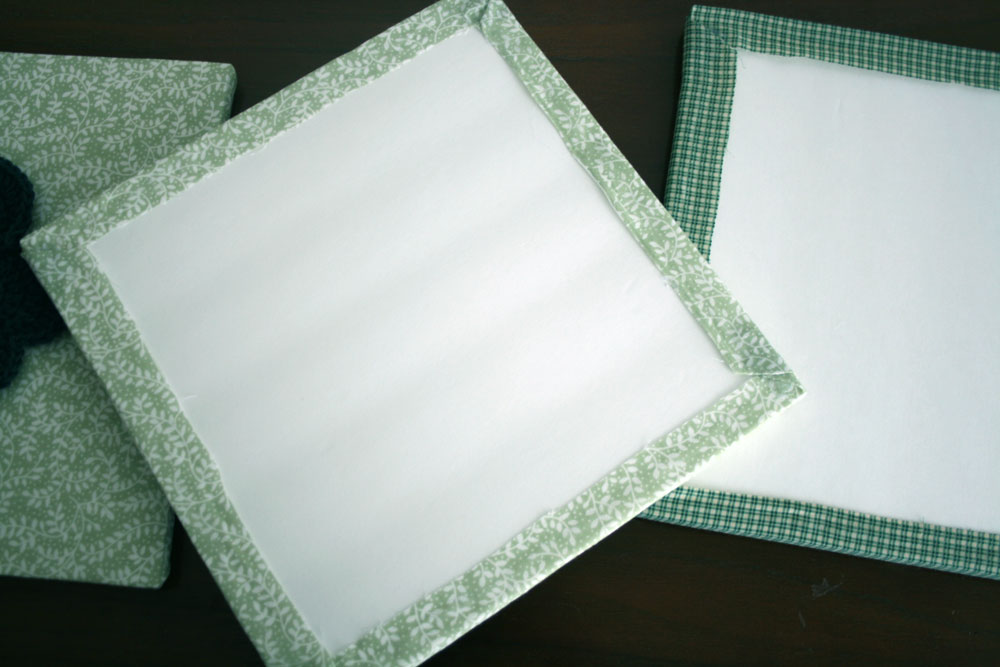
I wanted these to look like canvases so I glued together 2 squares of foam board to get a thicker look. Next, using a glue gun I stretched the fabric over the foam board and glued it around the edges on the back.
All you need now are some shamrocks. My large shamrocks were made from a pattern for shamrock potholders designed by Priscilla Hewitt. I made 2 but I only made the front side of them (the pattern tells you to make it double sided). Next I made a whole bunch of little shamrocks using a pattern from Suzies Stuff. They are super fun to make. I glued one big shamrock in the center of two of the squares then glued the little shamrocks on the contrasting square. That’s all. 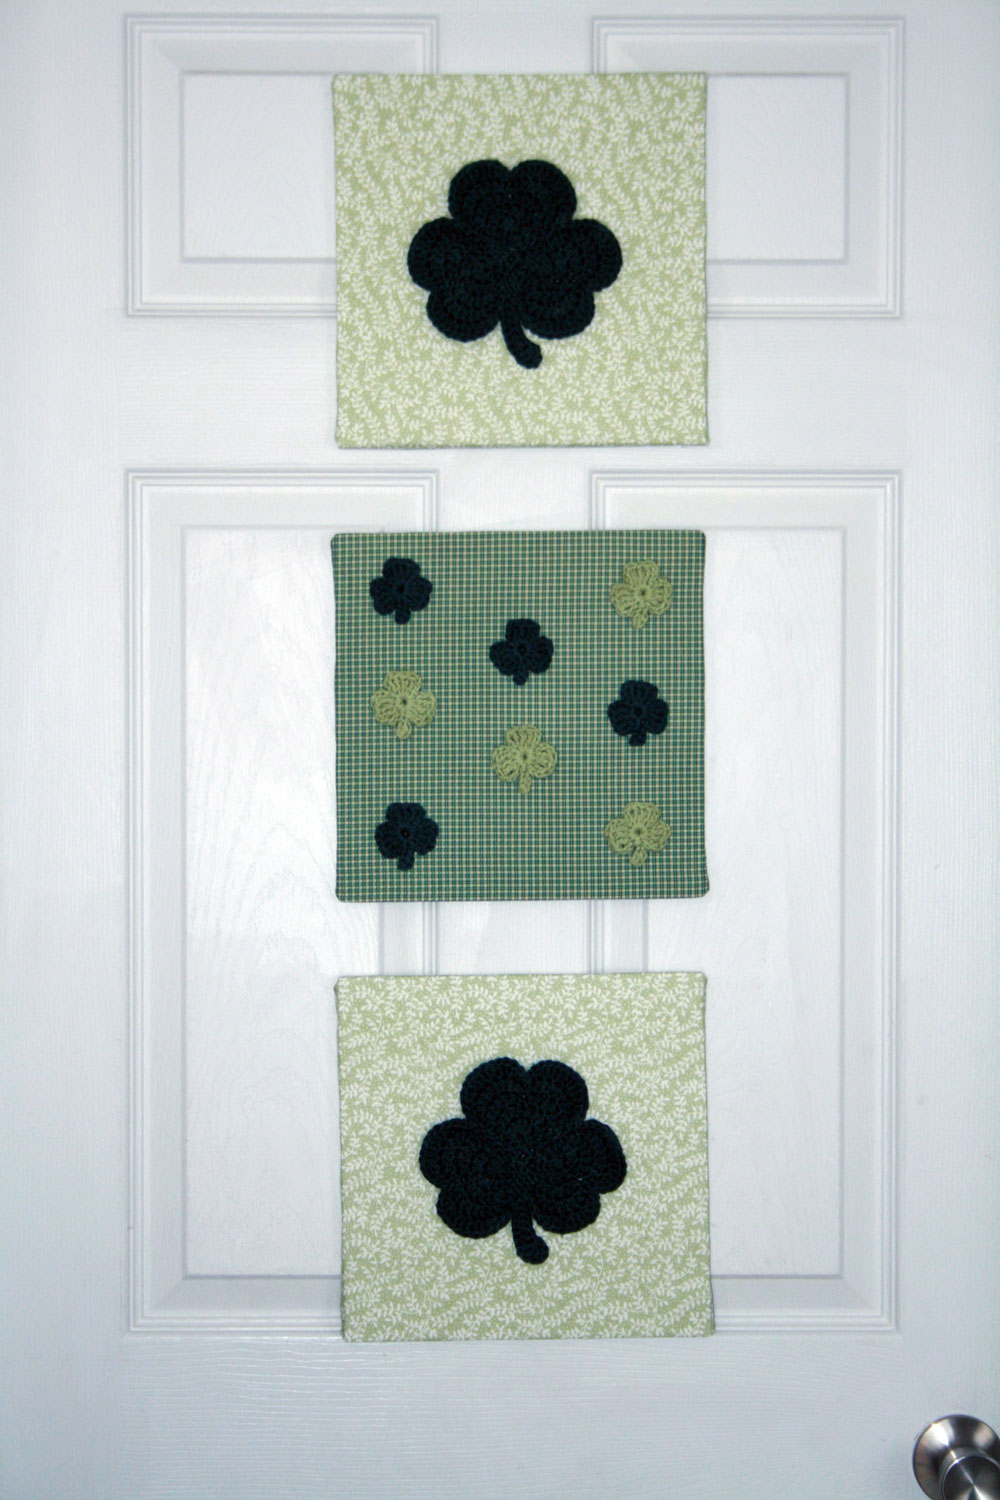 UPDATE: Sorry about my spelling in this post. I really need to proofread better. Also, I love my camera, she’s my dear friend, but sometimes we don’t get along at all. She’s being mean to me lately and we’re working it out together but in the mean time my photos look bad. We both apologize.
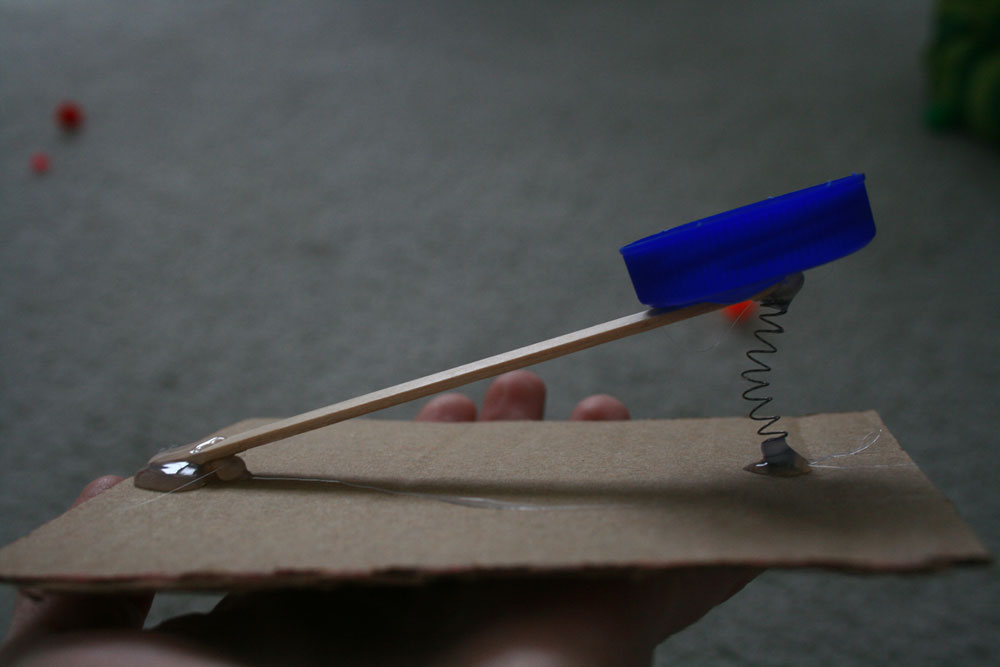
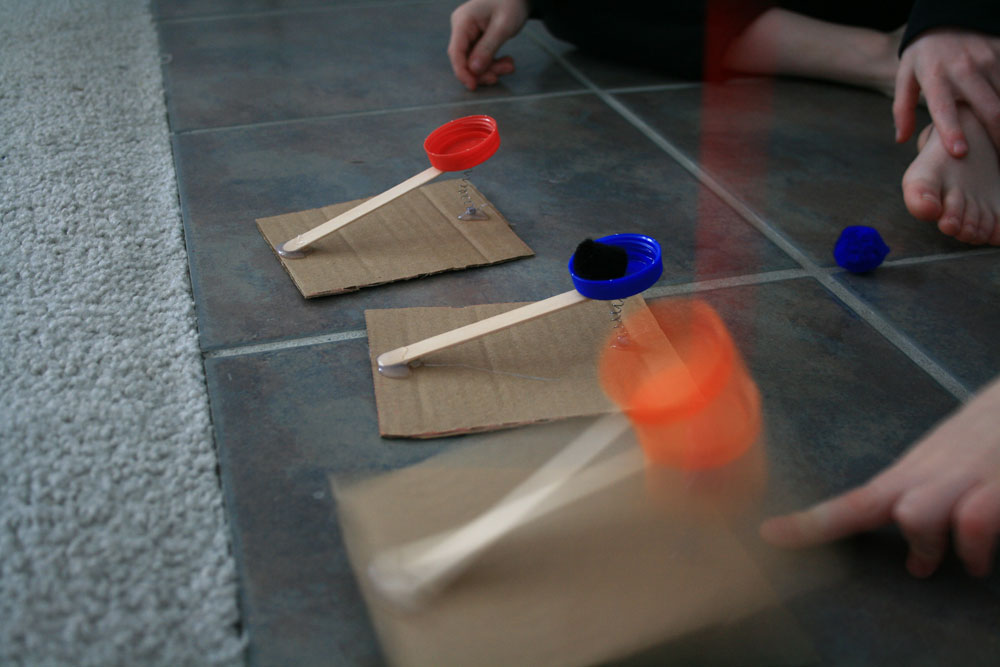
Catapult
The other day I saw instructions for this craft on Journey Into Unschooling.
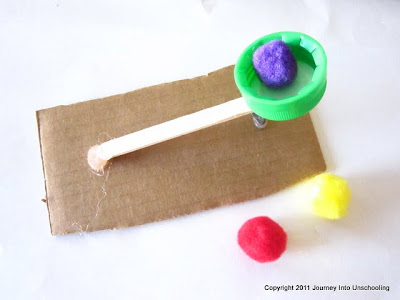
Fun right? The perfect craft for kids stuck home recovering from illness. Well I’m the one who made the craft, my kids are too little to play with hot glue. They sure had fun with their own little catapults though.

Ninja Birthday Party
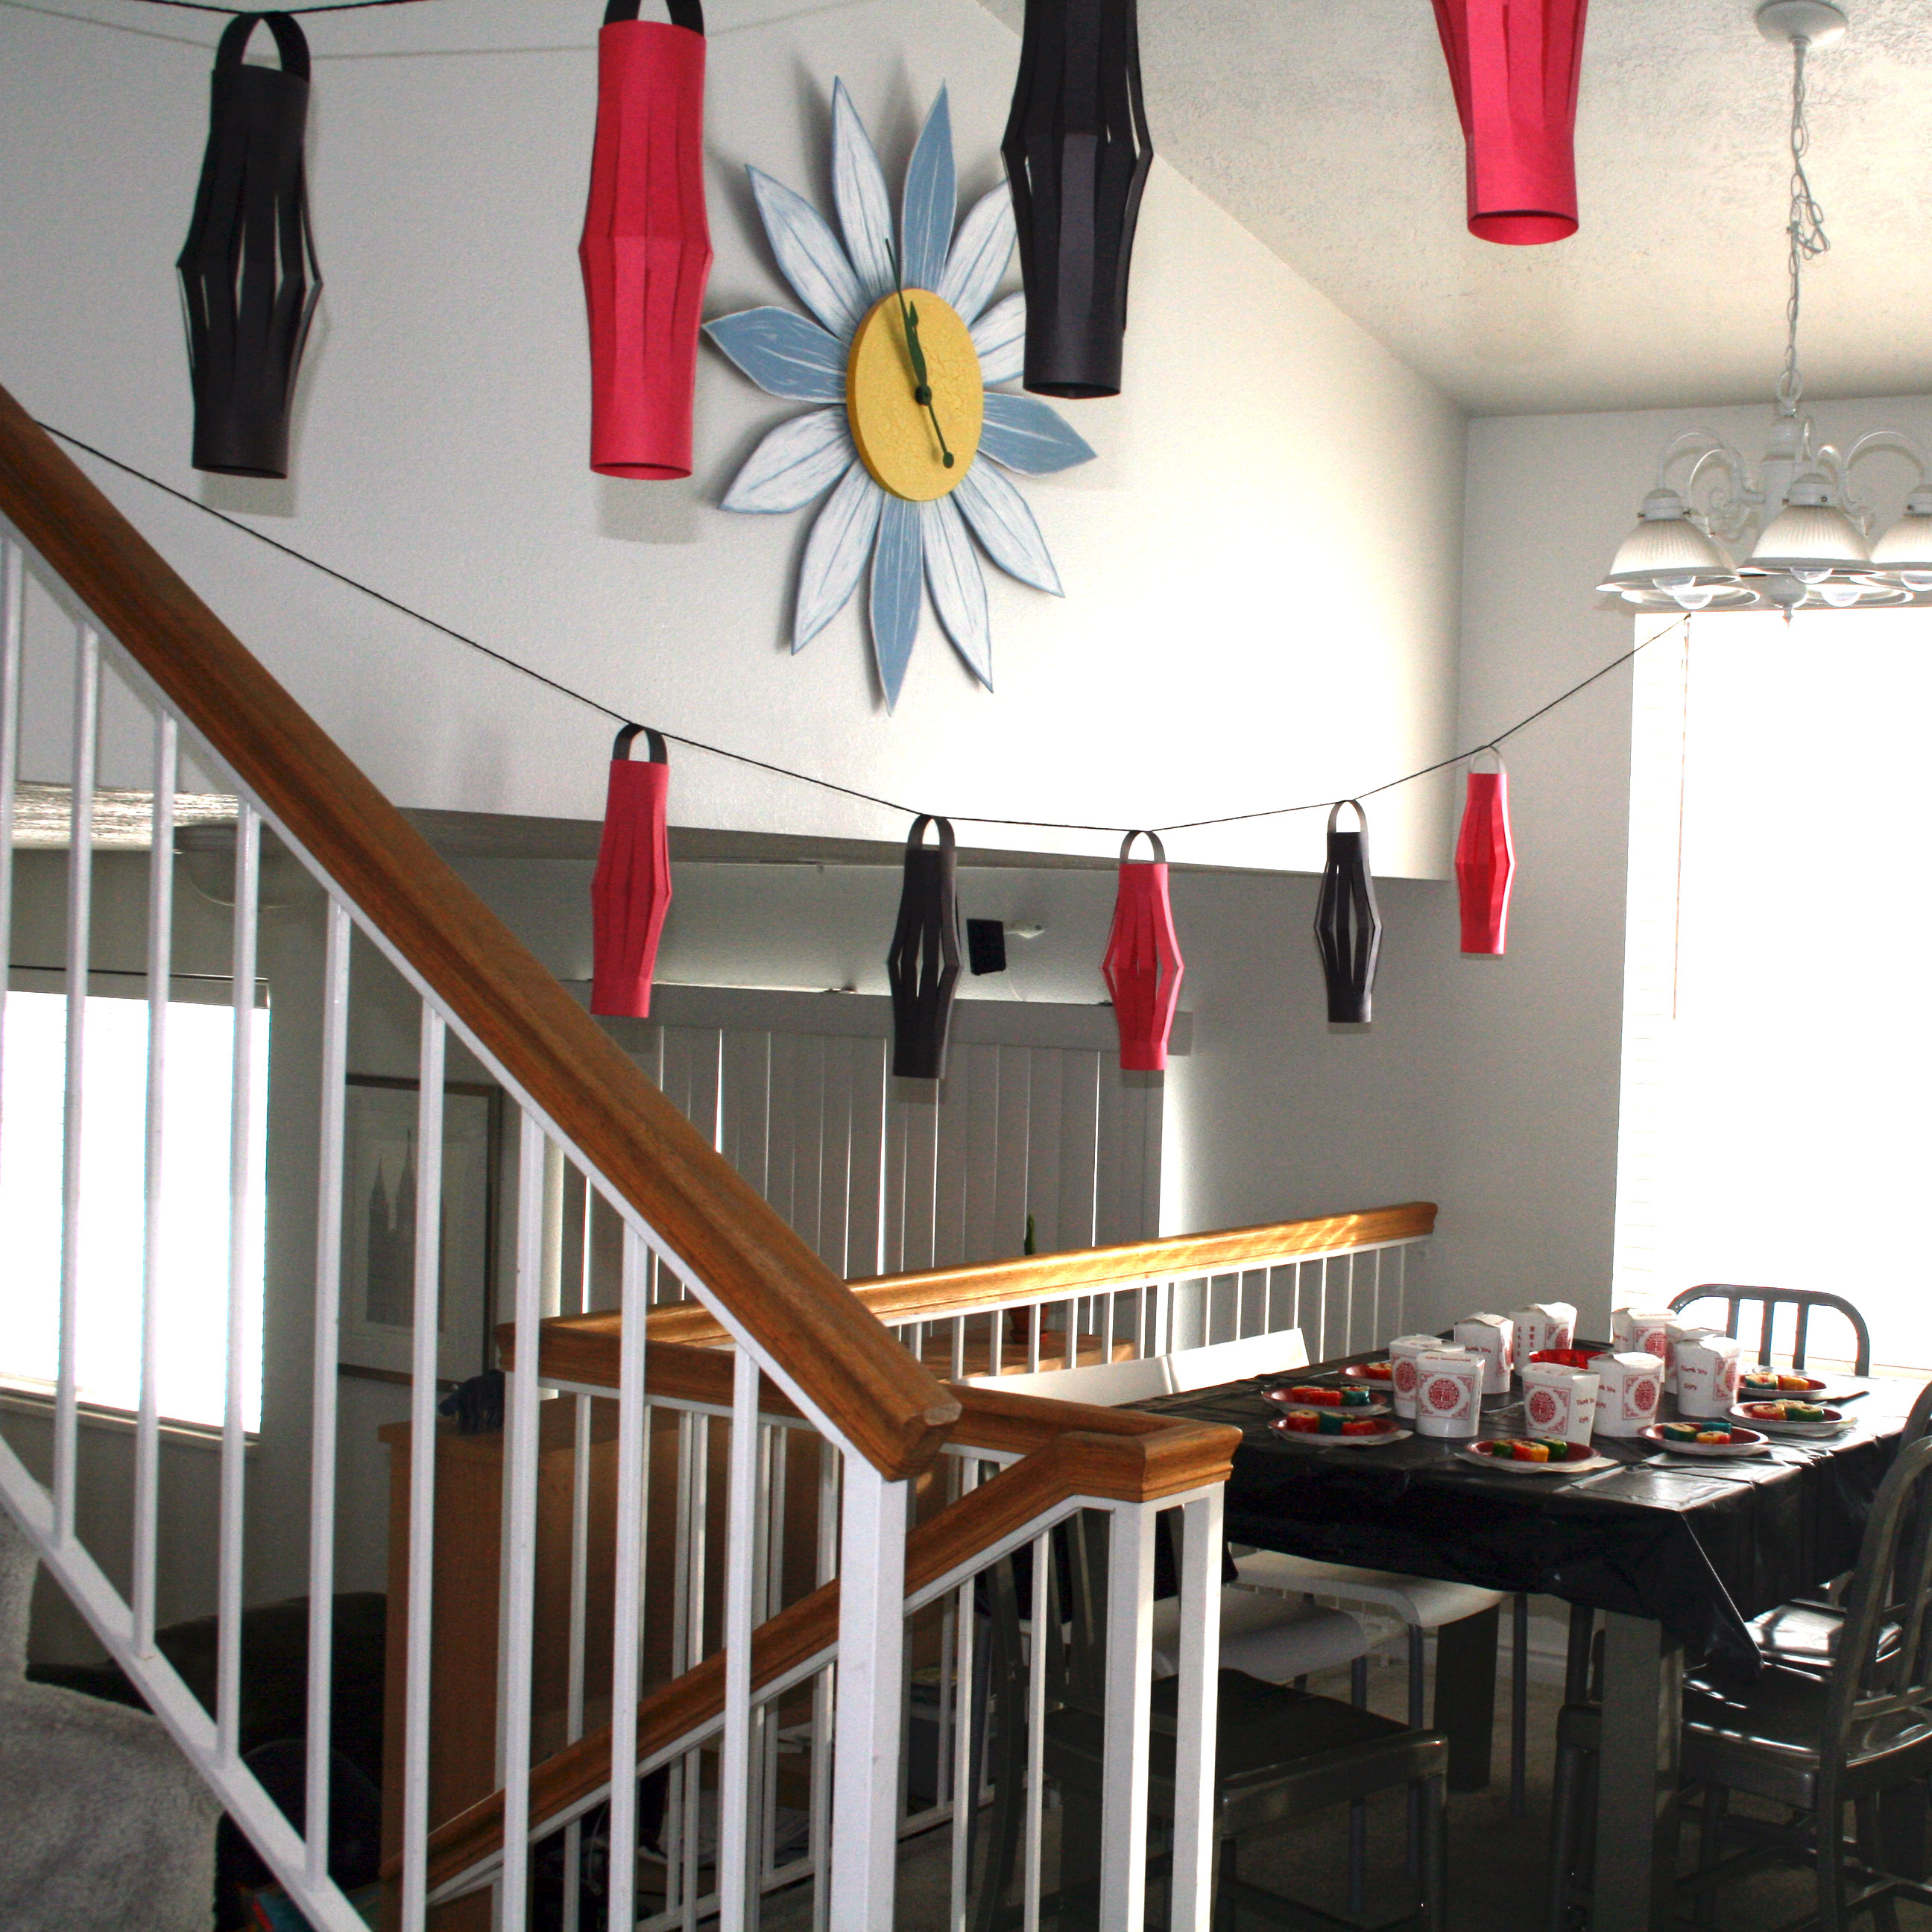
It has been one crazy week here at my house so I haven’t had a chance to be very crafty. I thought about crafts as I cleaned up after sick kids. I also thought about crafts when I sat in the doctor’s office waiting for him to tell me that my baby does have R.S.V. And I thought about crafts while I washed loads of laundry. I did not actually do any crafts though, so no blog post this week, right? Wrong! I’m going to tell you about the ninja birthday party I hosted for my 7 year old’s birthday.
First, a disclaimer: I have never attended a kids birthday party, not even as a kid. Thus, I was really nervous about what to do. The Boy wanted a ninja party so I started searching the web for and thinking of ideas. I started with Chinese lanterns just like I remember making in elementary school. My kids were able to help, which makes them extra fun. Then we hung them from banisters and things.
The guests were sent invitations to a ninja training. We rolled up the invitations like a scroll and tied them with red ribbon. When each child arrived at the party they were given a ninja head band so they felt more like ninjas.
I assumed that there are games at a typical party so I set out to think of some for the party . I remembered that my brother used to make paper ninja stars when we were kids so I found instructions online and made each child their own color of stars. We played a game where we improved our aim by throwing them at pictures of dragon faces on the wall.
I found an idea online for a game where you try to keep a balloon afloat using ninja swords, so my quest for cheap ninja swords began. I searched dollar stores and party stores but alas no swords. I also didn’t want to spend $1 per kid for them because I was doing other stuff too. Then my brain came up with a great idea (this doesn’t happen all that often). 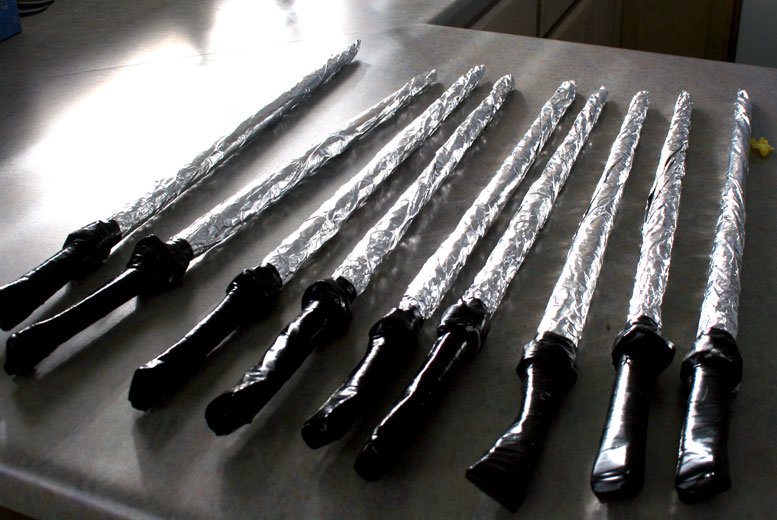 I made these ninja swords by rolling up sheets of newspaper from corner to corner. Then I taped it so it wouldn’t unroll. I folded up the bottom to make the handle a bit more substantial then wrapped it in electrical tape. Finally I wrapped the sword in tin foil. I love the results. The kids did too. They weren’t awesome at the game. They just wanted to pop balloons with their swords, but that kept them busy.
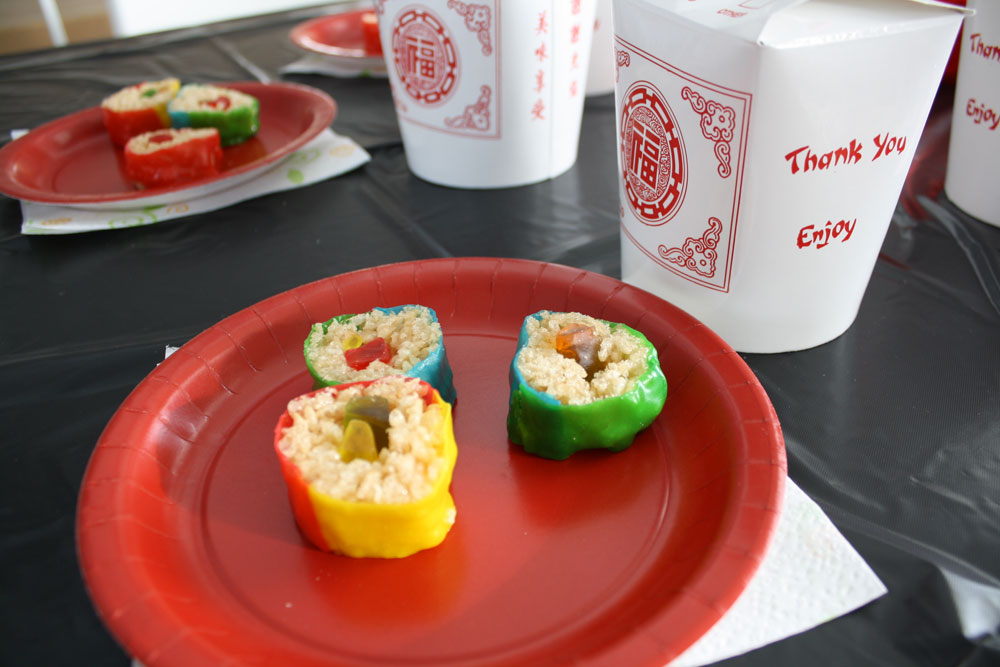
Instead of cake we had candy sushi. It turned out so cute and super tasty. I keep trying to think of other things to do with rice krispy treats covered in fruit roll up. 
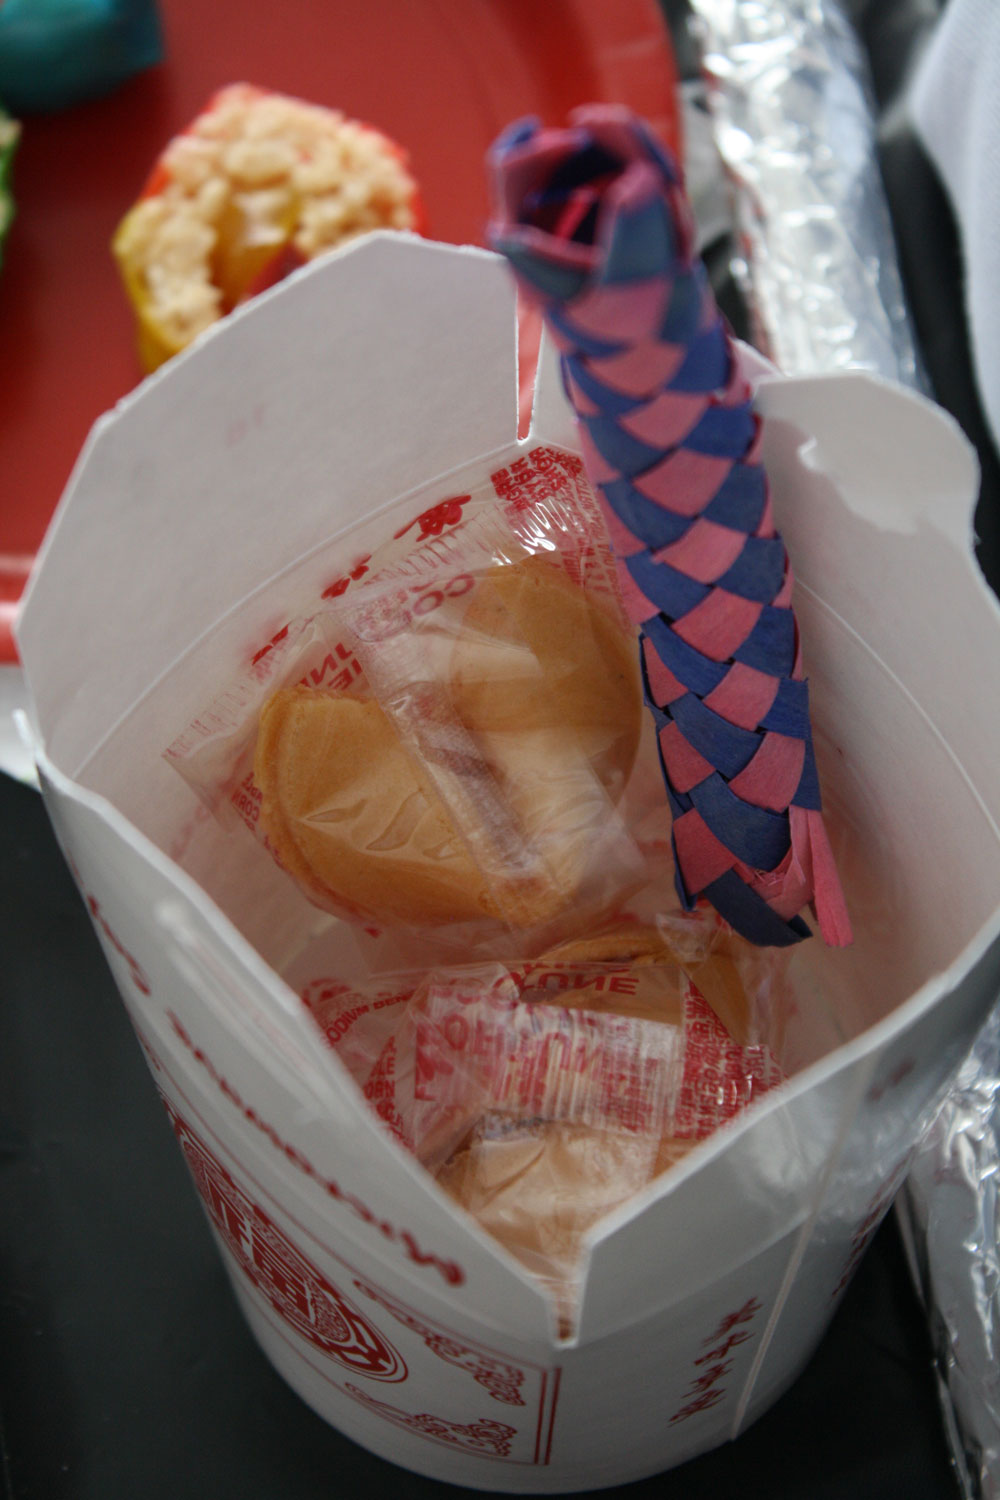
 For party favors I wanted take out boxes from a restaurant. I looked at party stores but they were so expensive. Then my sweet husband brought home the perfect boxes that he asked for at a restaurant where he had lunch. They gave them to him for free, but he said he left a big tip.
We filled the boxes with fortune cookies, Chinese finger traps, and plastic ninjas that I got at the dollar store.
 My first birthday party was a success. The kids had fun, my little ninja was happy, and the mom was the hero of the day!
Paper Mache Hearts

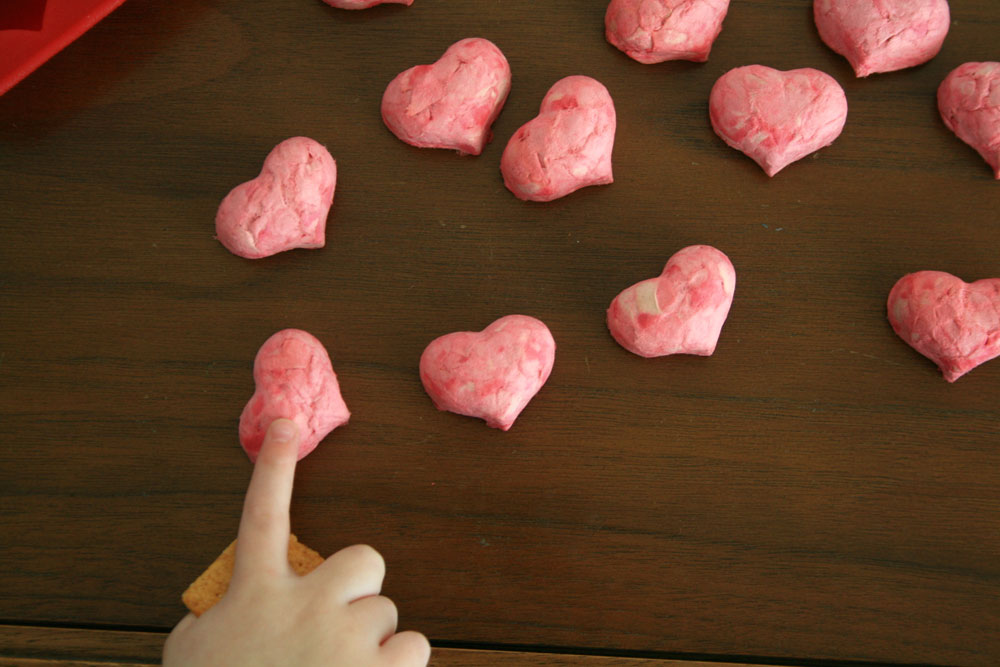
I think my favorite blog in the world is Dollar Store Crafts. Heather is a miracle worker, and I’m a big fan of the way she turns the cheap into the beautiful. Back in October she made paper mache skulls that were so cool, I just had to try it with hearts. I thought it might be cute to use construction paper instead of news paper because then they’d be scrappy and pink. This worked out great, except that I had to leave the paper to soak for a lot longer than an hour. After about 6 hours I was able to break the paper apart with my hands, but the mixer did nothing but spit the paper around. (See the skull tutorial to see what I’m talking about.) I love the way they turned out. The only problem now is that I don’t know what to do with them. Any ideas?
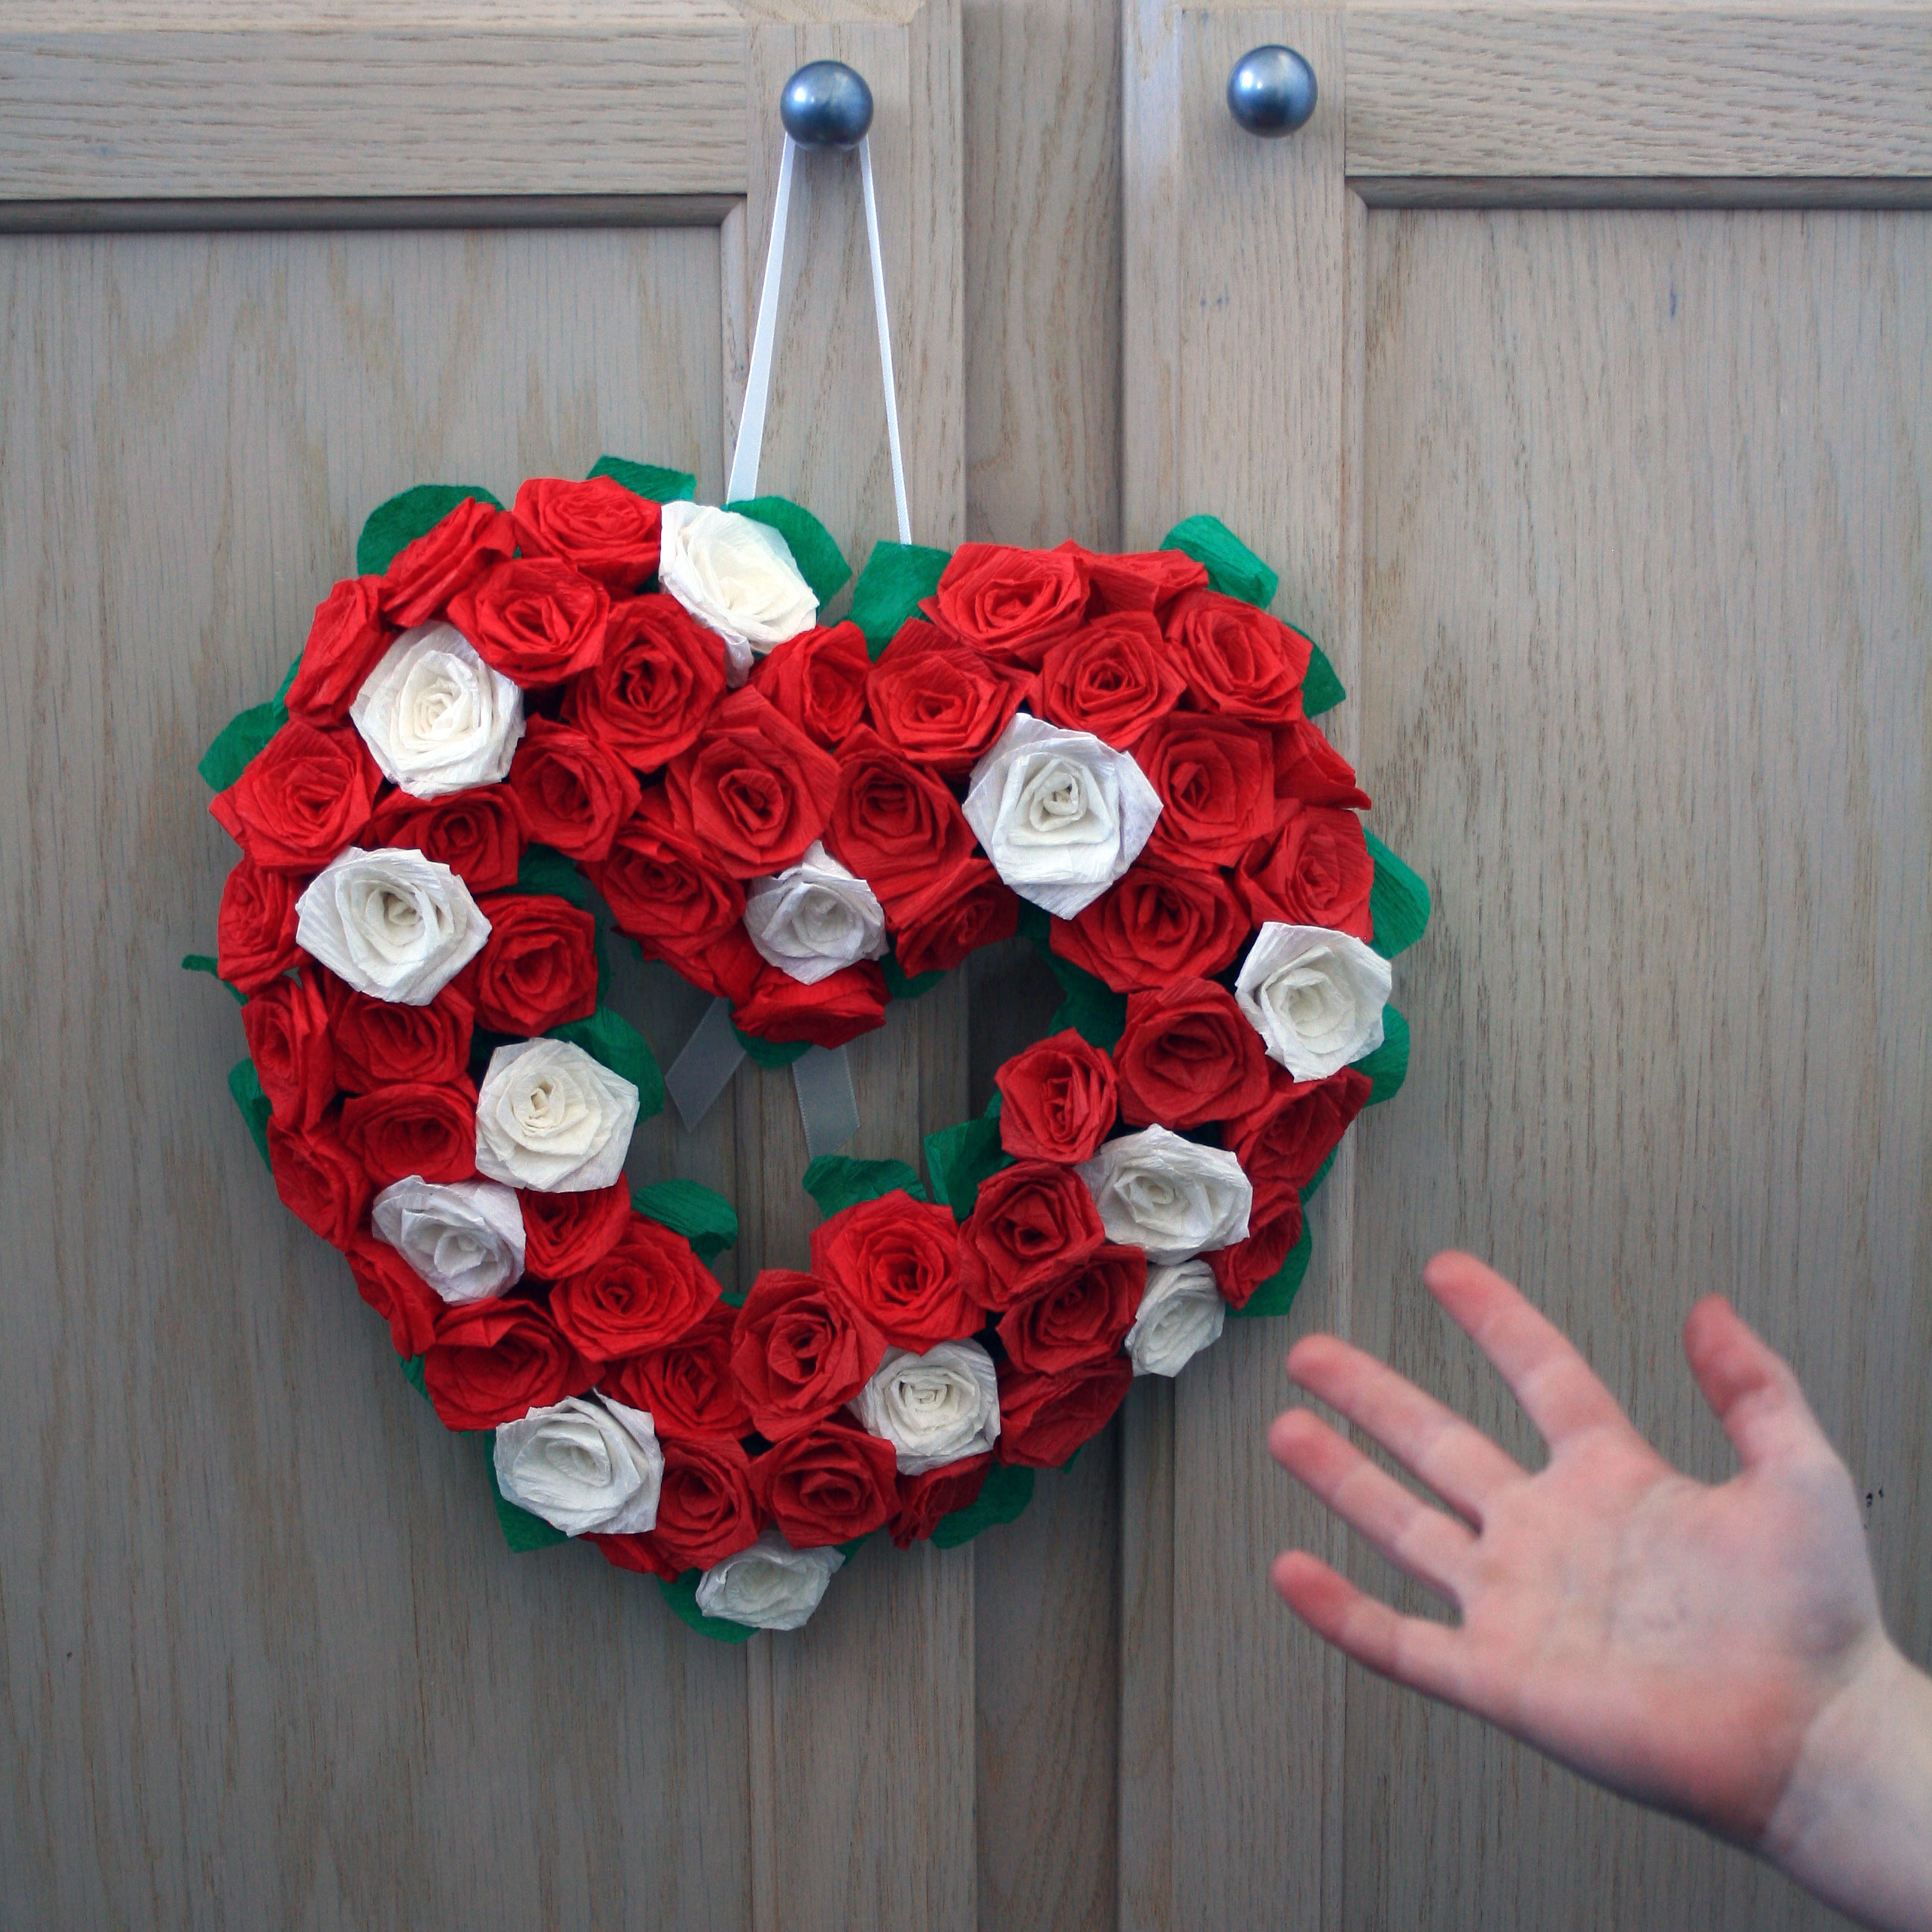
Crepe Paper Rose Heart

I love the roses I learned to make on Filth Wizardry. I make them all the time. Not because I have any reason, just because they make me happy. I would show you how I make the roses, but that would be silly when there’s such a great tutorial video on Filth Wizardry! My newest creation from crepe paper roses is this wreath.
I got the idea for a crepe paper rose wreath from At Second Street. Her roses are beautiful, but I wanted to try a similar concept with different roses.
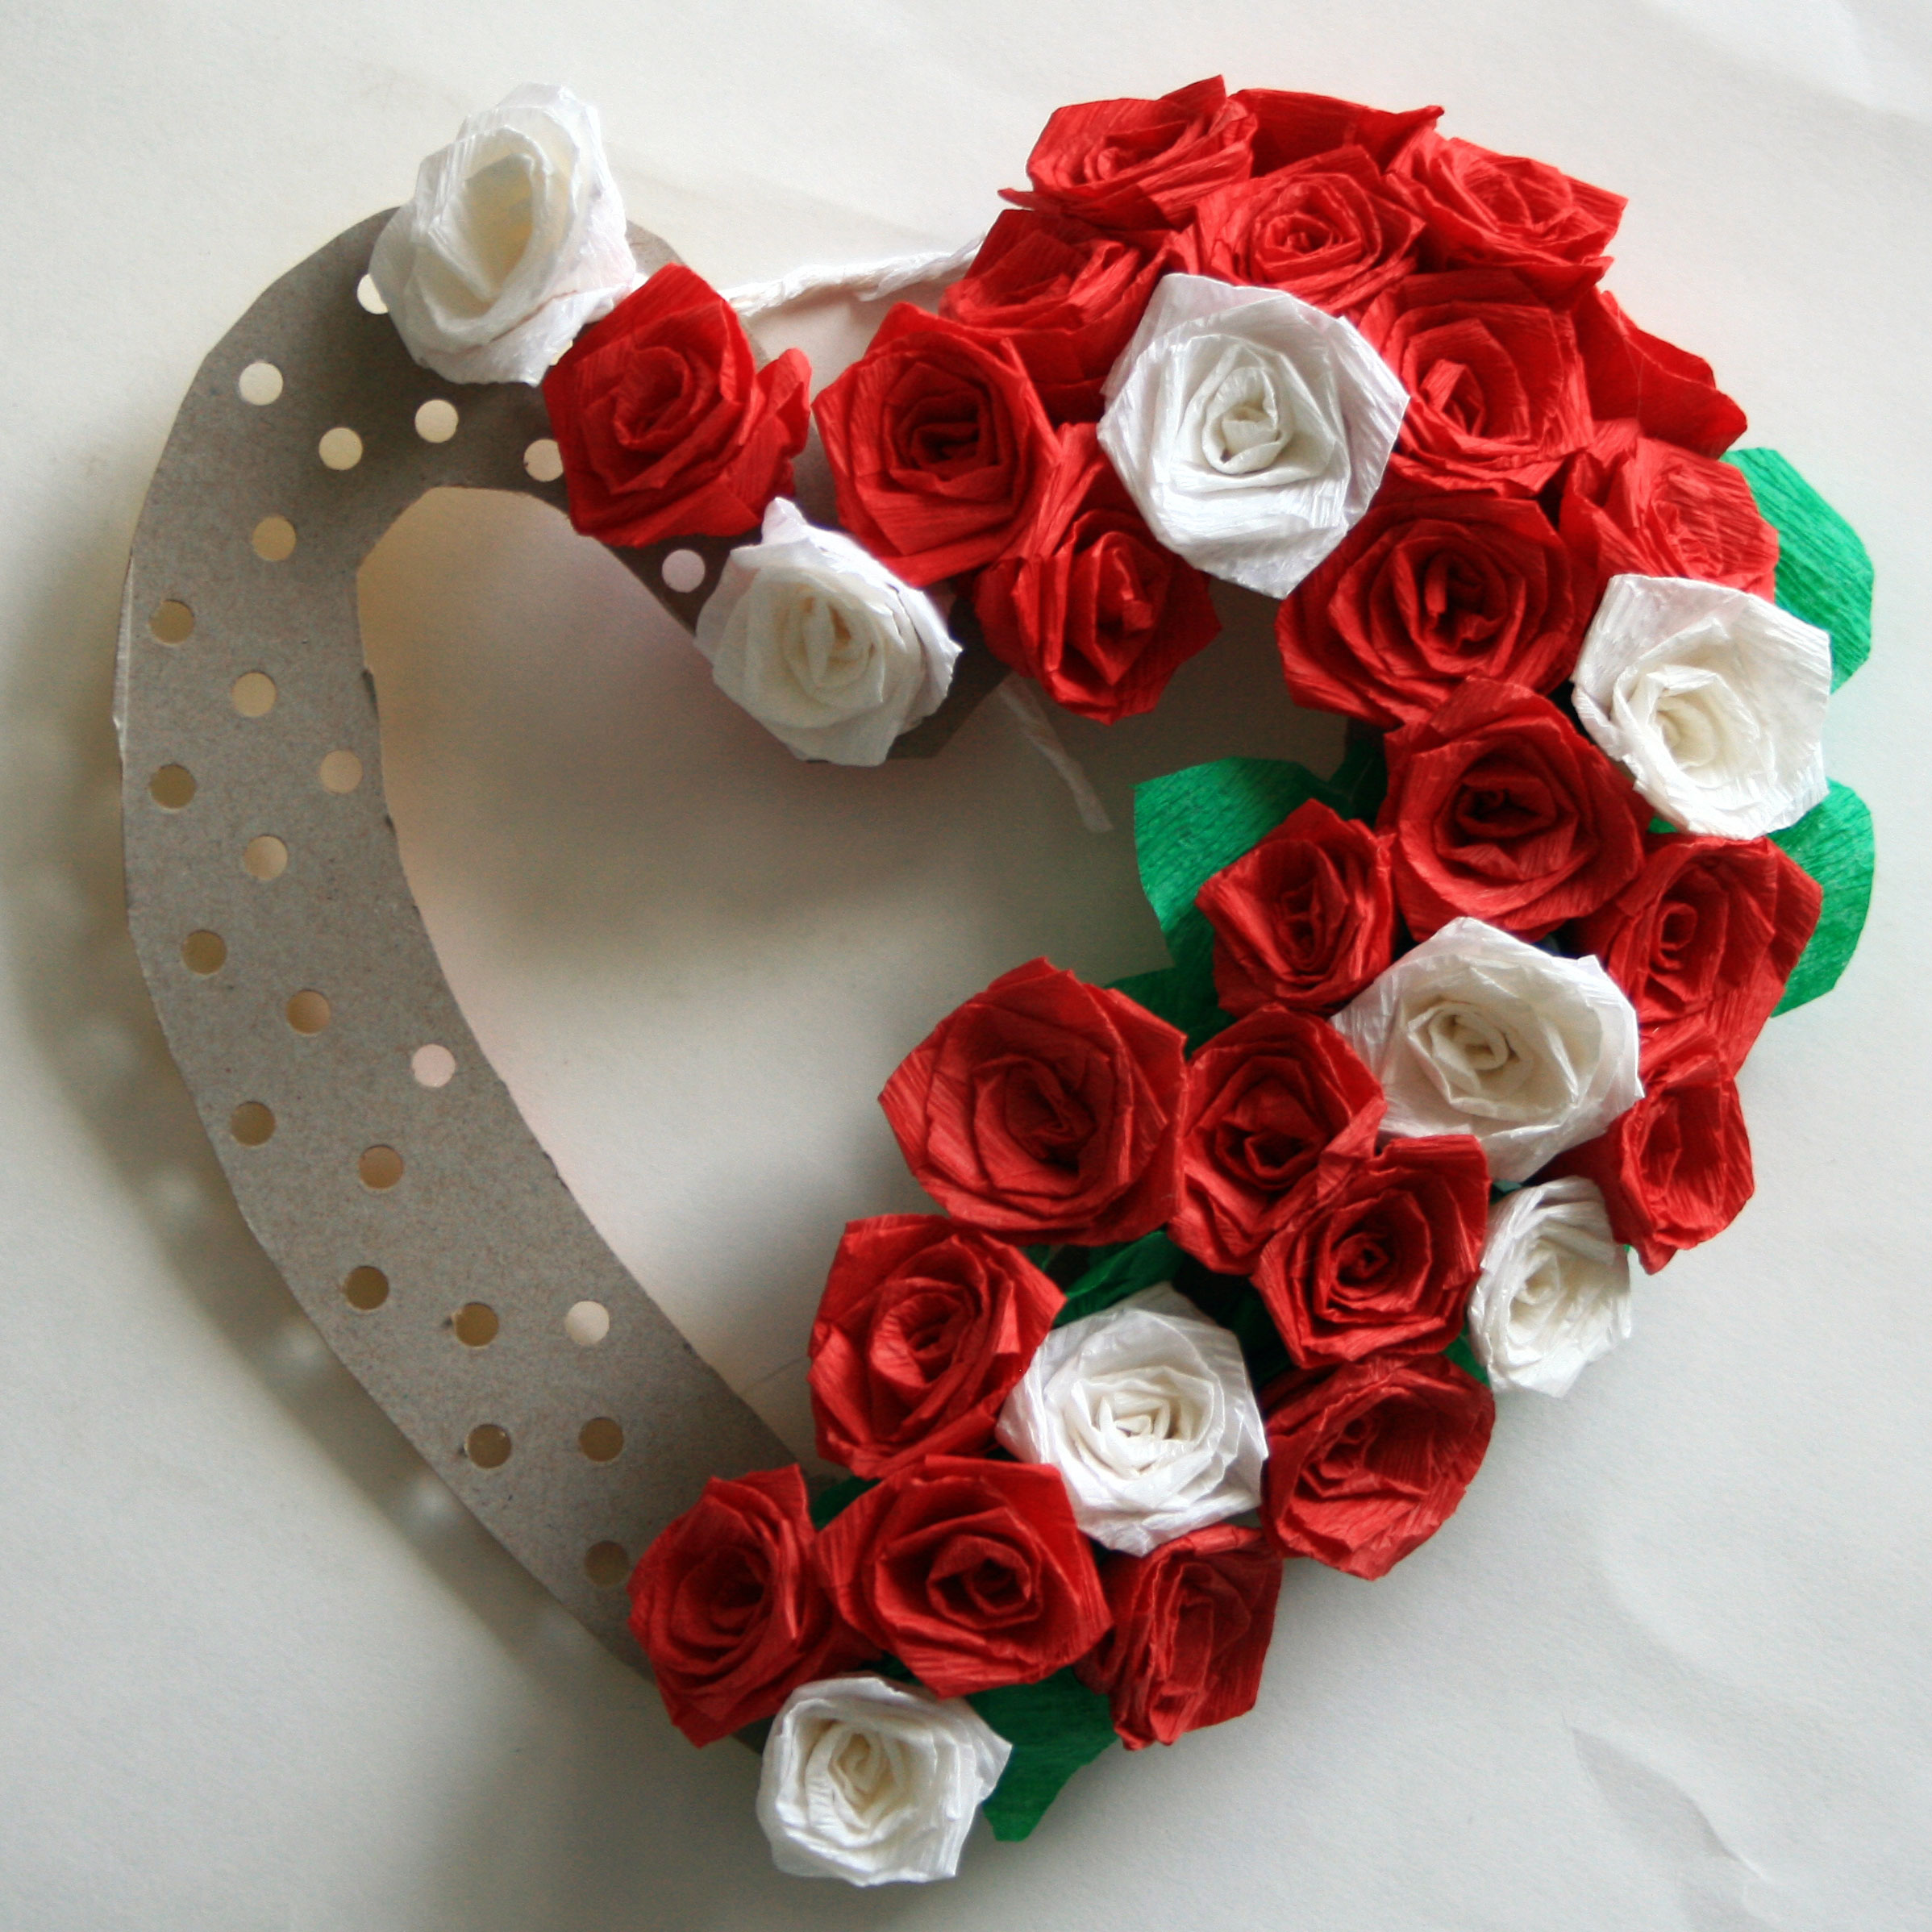
First, I cut out a heart shape from a piece of cardboard, specifically a ritz cracker box. When I make a rose, I have to have a stem so I used a hole punch and made holes for each rose. Then I threaded the rose stems through the holes.
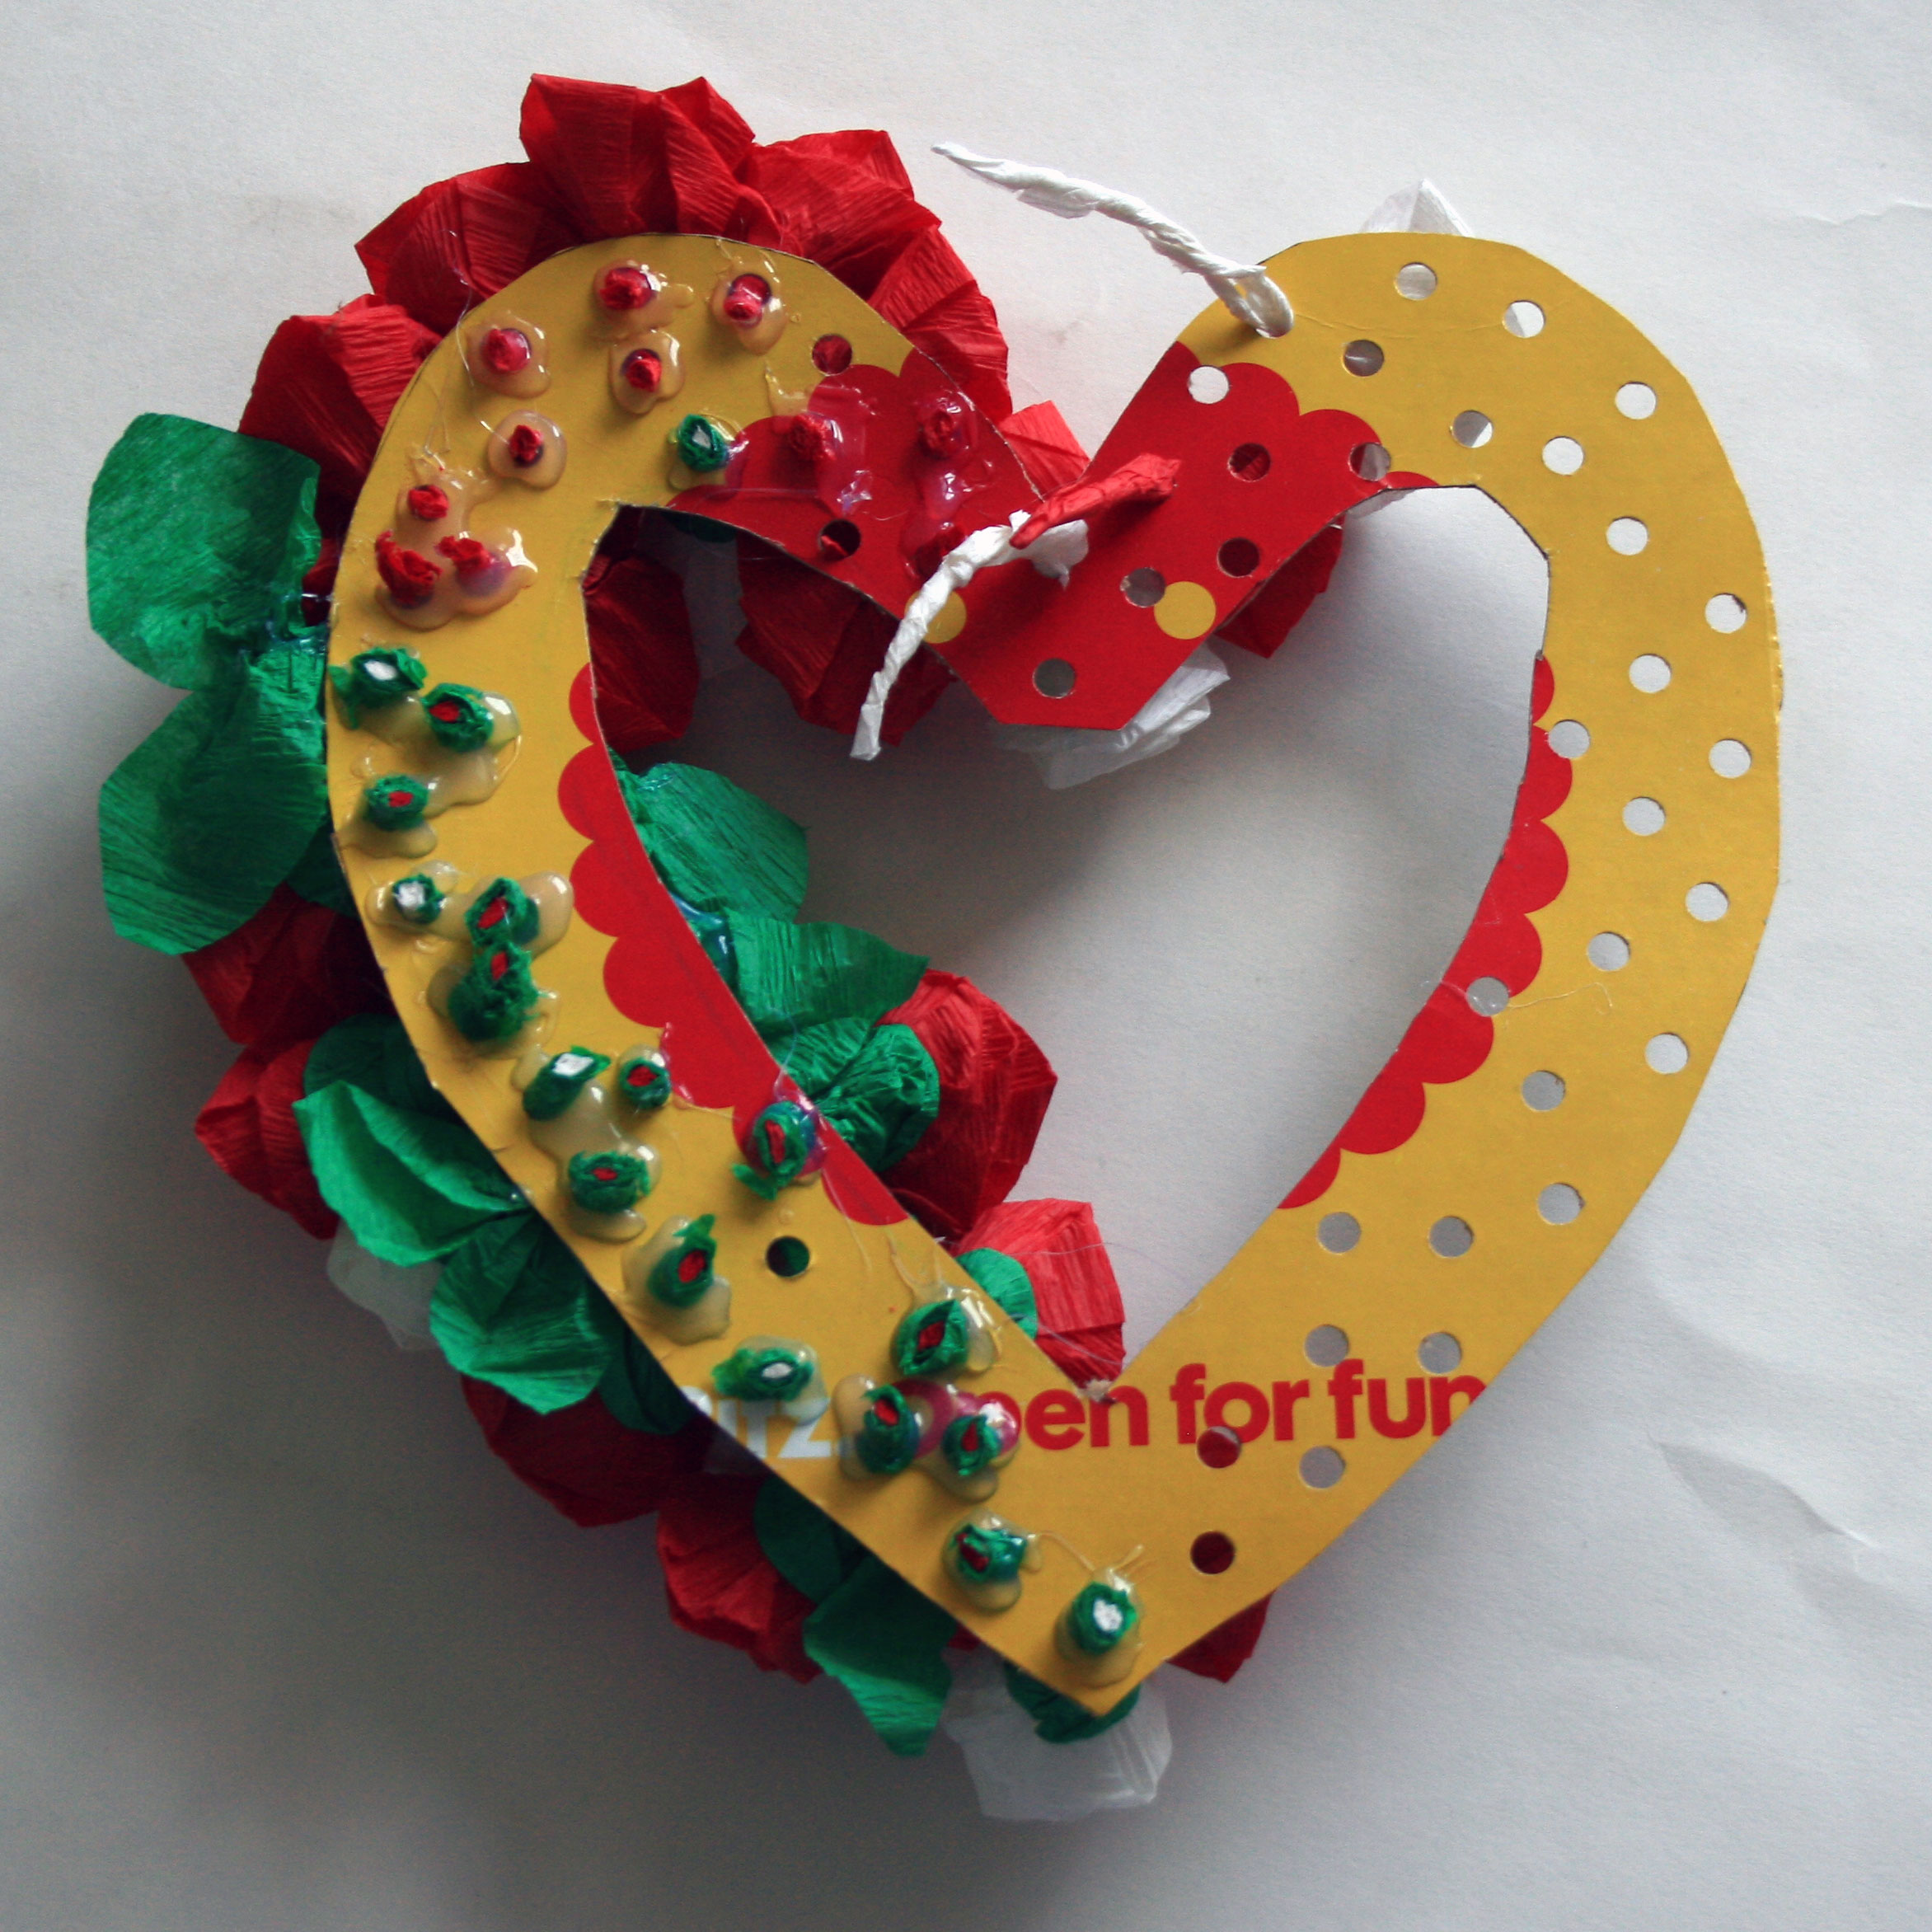
Next I hot glued the stems on the back side and clipped off the extra stem parts. When all of the roses were glued in place I made green leaves and glued them around the outside of the heart.
To make the leaves I just folded a piece of crepe paper in half and cut the top like a leaf and twisted the bottom. I was going to glue another piece of cardboard to the back, but I’m not that tidy.
Glue a piece of ribbon to the back of your wreath, and you’re done. Beautiful results for not so much work. It does take a while to make all of the roses (I think there are about 60) but you can do that while you’re watching some romantic valentines movie….or watching some action adventure because you’d rather be sitting next to your valentine.
Teddy Bear
When I’m in between knitting projects, and I just don’t know what to do. I like to make knitted or crocheted animals. My favorite knitted animals are teddy bears. Specifically the Save the Children Teddy. They make me super happy.
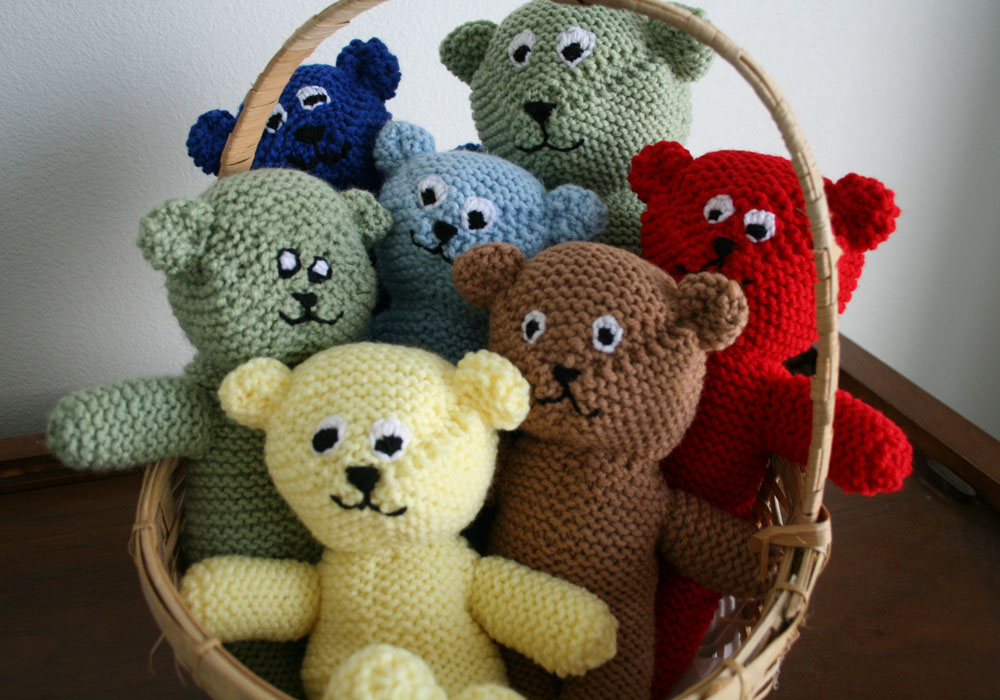
There’s something about making something with a face that’s so satisfying. One of the things I like most about this pattern is that it’s all one piece except the arms. It is sewed together up the inside of the legs, the center of the tummy and in a V from the nose to each ear. You stuff it as you sew it together, then sew on the arms and embroider a face. I’m not great at faces. Even still they turn out pretty cute and lovable. 
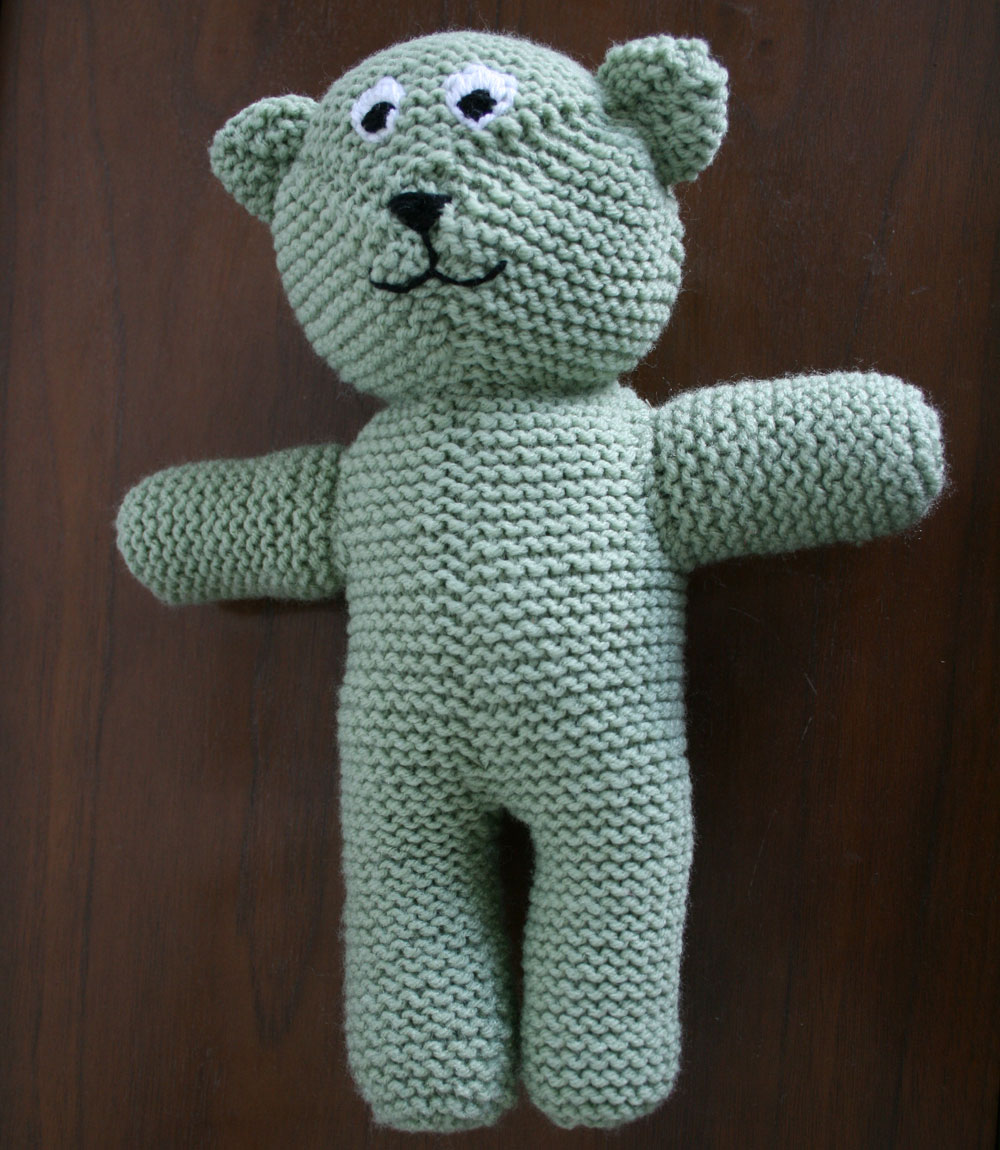
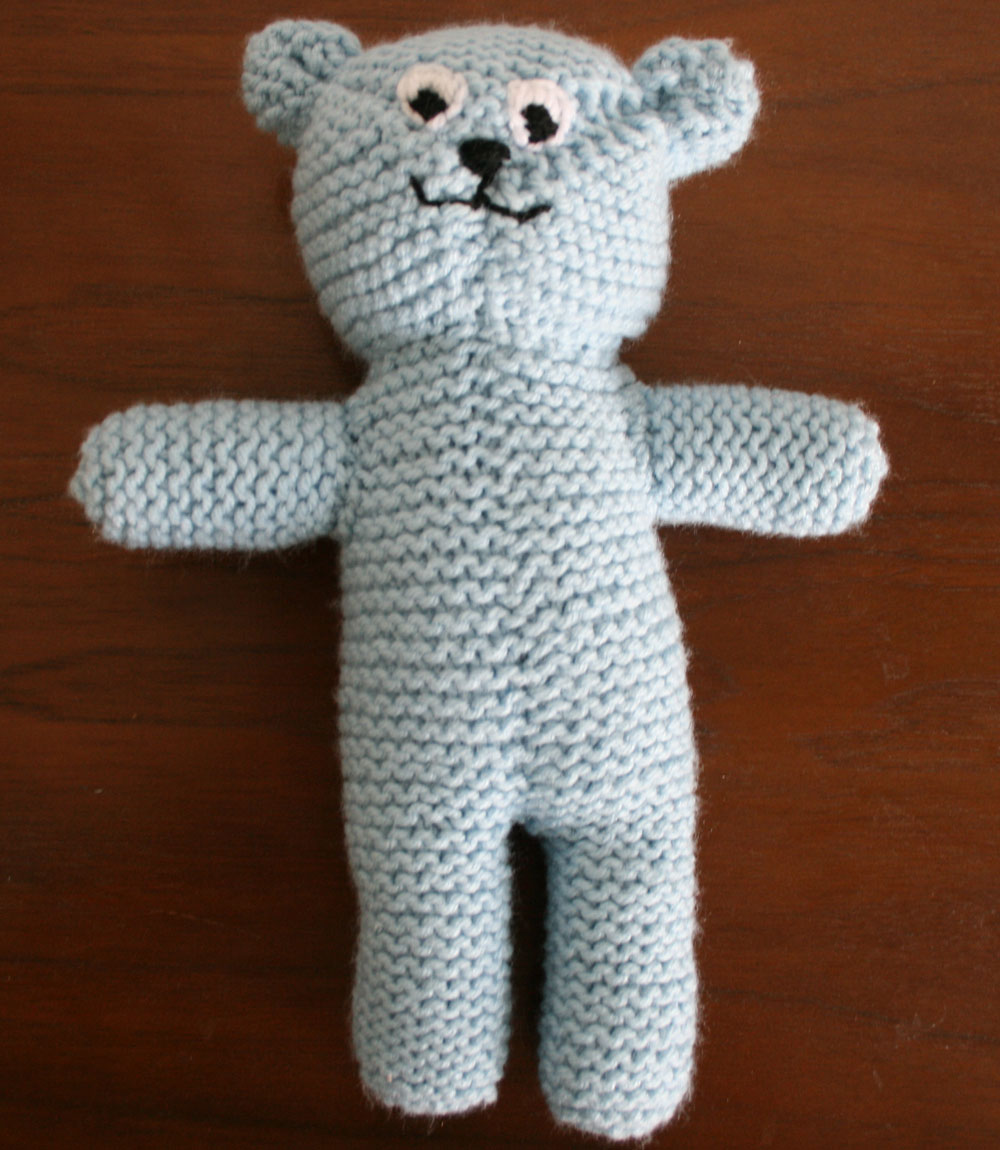
My first bear was the green guy on the left. He turned out great but I felt like he was a little too big for the quick, satisfying project I was going for. For the rest of the bears, including the blue fellow on the right, I modified the pattern using fewer stitches and fewer rows. I don’t think the shape of the smaller bear’s face is perfect. I only made one big guy though so it could have just been beginners luck. Old bluey here is about 10 inches and big green is 14 inches when knit on size US 4 needles. If you want a copy of my changes, email me and I’ll send them to you.
I made my bears to give to a charitable organization. I haven’t given them away yet, I’m still adding to the collection, but I love knitting along thinking about some little child loving one of the bears that I made.
Candy Sushi
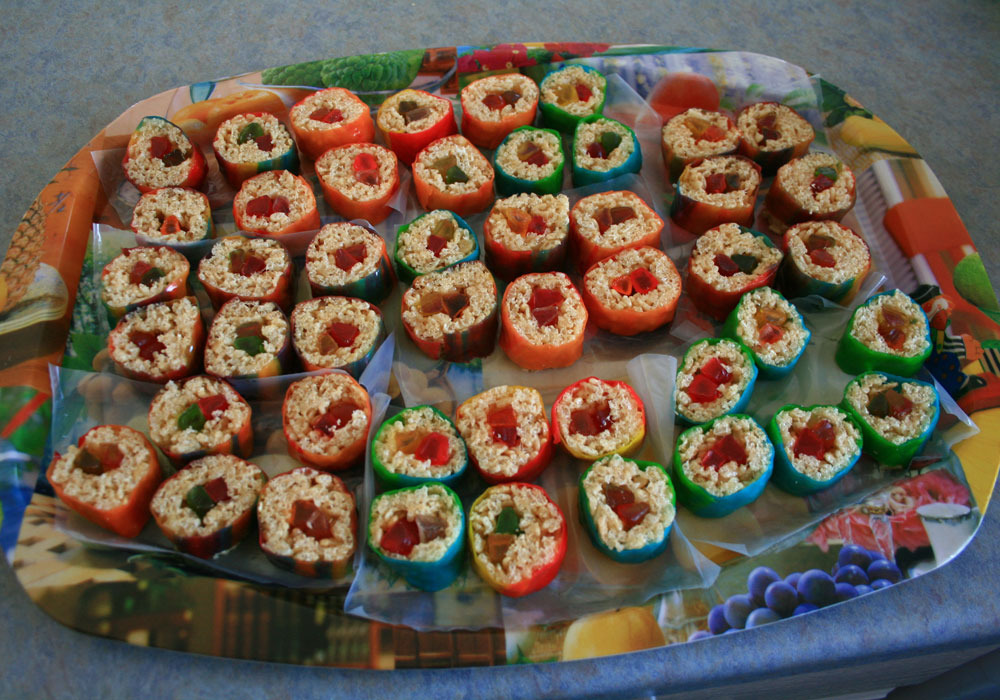
When my oldest son turned 7 last month he chose to have a ninja party. There aren’t many party ideas out there for a ninja party so I came up with a few of my own ideas (look for more ninja party posts later). One Idea I did find online was candy sushi. It seemed to go with the theme. My little guy doesn’t like chocolate or cake so it also seemed like a fun alternative. My first attempt at making candy sushi was…well it wasn’t great. The second time around though it went really smoothly. Maybe I can help you avoid my mistakes!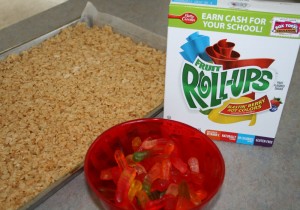
Ingredients
40 big marshmallows
6 cups Rice Krispies
3Tbs margarine
Cooking Spray
1 pkg Fruit Roll-Ups
1 pkg gummy worms
So you start by making Rice Krispie Treats. Here’s some instructions if you don’t know how. If you do, go on to step 2
Step 1: Place marshmallows and margarine in a bowl. Cook in microwave for 2 min, stir then microwave for 1 min. 30 sec. Stir again, then add Rice Krispies. stir and stir and stir some more.
Step 2: Spread Rice Krispie mixture into a cookie sheet lined with wax paper and sprayed with cooking spray. Don’t skip the cooking spray. It’s important. Let this cool for about 5 min.
 Step 3: Place gummy worms close to the edge of the pan. I have seen people use licorice but i like gummy worms better. I put 2 side by side all the way across the pan.
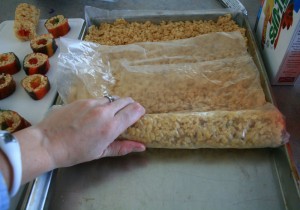 Step 4: Pick up the wax paper and use it to help you roll the rice krispy around the gummy worms. Use a big knife to cut along the edge of your roll then squish the roll with your hands to make sure the gummies are secure in the middle of the roll. I do this entire step with the wax paper around the roll, it’s just less messy that way.
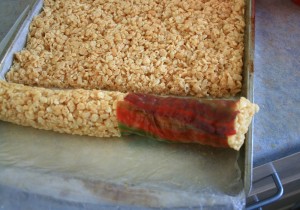 Step 5: Now you are going to wrap the roll you just made in a Fruit Roll-Up. This is when I ran into the most problems, so I will impart my Fruit Roll-Up wisdom on to you. I couldn’t get the thing off the wax paper it comes in. It kept tearing and I kept cursing. I figured out that if you put the Roll-Ups in the fridge for a couple of min. it helps alot. I also couldn’t fit the Roll-Up around my roll. I don’t know if I made the roll too large or what, but I learned that you can stretch a Fruit Roll-Up quite a bit and it’s much easier to do that before you wrap it around your roll. Be gentle though, it will tear and you will curse. Now you Squish the the whole thing with your hands. That helps the Fruit Roll-Up stick better to the Rice Krispie roll.
Step 6: Move your Roll-Up covered roll to a cutting board and use a good knife to cut 1-2 inch slices. Sometimes the gummy worms jump out. Just stick ’em back in.
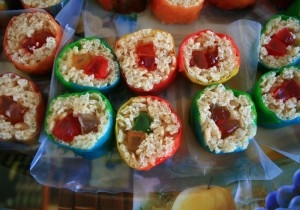
Step 7: Place on some kind of sushi appropriate dish and revel in your cleverness. I don’t have a sushi appropriate dish so I just used a tray. Lame.